Comment cards created by you and your collaborators appear along the right side of your document. Clicking the speech balloon icon at the upper-right corner (to the left of the webcam icon) will open a side panel that lists all the comments that have been added by you and your collaborators. You can scroll through the comments on this panel to read them, and you and your collaborators can reply to each one with a brief message and/or mark them as resolved.
Reviewing all the comments in a document.
Howard Wen / Foundry
Using the Docs, Sheets, and Slides mobile apps to add and review comments
You can add and review comments in the Google Docs, Sheets, and Slides mobile apps.
To add a comment: In Android, tap in the document where you want to attach a comment (or tap to select an item in the document). Then tap the speech balloon icon at the upper-right corner.
On the Comments panel that opens at the bottom of the page, tap the speech balloon icon with a + inside it. Enter your comment. When you’re finished, tap the right-arrow icon to insert your comment into the document.
Adding a comment in the Docs app for Android.
Howard Wen / Foundry
In the iOS apps, theoretically you can tap the text or image you want to comment on, then select Add comment from the toolbar that appears. But this toolbar only appeared some of the time in our tests. If you don’t see it, double-tap in the document where you want the comment to appear, then tap the + icon at the upper right and select Comment.
Either way, a comment box appears below the page. Type in your comment, then tap the right-arrow icon to insert the comment.
To review all the comments in a document: In both Android and iOS, tap the speech balloon icon at the upper-right corner to open the Comments panel. On this panel, you can scroll through all the comments in the document. Tap a comment to open it, and you can reply to it or mark it resolved.
Reviewing and replying to a comment in the Docs app for Android.
Howard Wen / Foundry
Making direct edits and rolling back edits from other collaborators
You and anyone you’ve assigned to be an Editor can edit your document — add, delete, or revise text, insert images, and so on. With multiple people editing the same document, it can be difficult to keep track of who’s done what, and you might not agree with all the changes that others have made. That’s where version history comes in. From the menu bar above your document, select File > Version history > See version history.
The “Version history” page shows a listing on the right side of older versions of your document. The tile for each version states the date and time when a major revision was made to your document and by whom.
When you click one of these dates, the version of your document that was saved at that time will appear in the main window. (If you want to give an older version of your document a unique name, click its date. You’ll then be prompted to type in words to replace the date.)

With version history, you can roll back to an earlier version of a document.
Howard Wen / Foundry
To restore an older version so it becomes the one that you and your collaborators will work on together, click the big Restore this version button at the top left of the page.
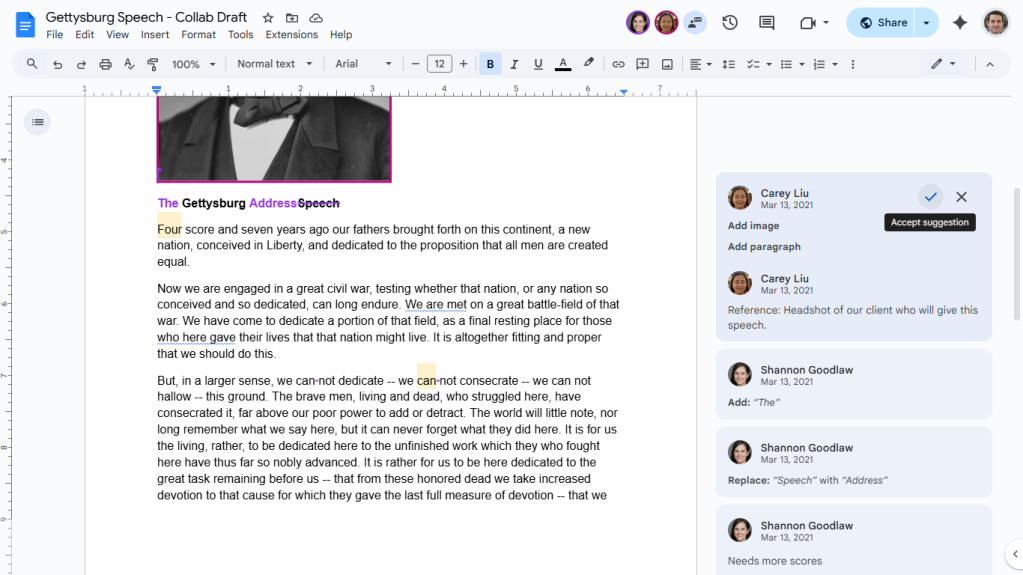
Suggesting edits in Docs
In Google Docs (but not Sheets or Slides), there’s a better way to keep track of changes made by your collaborators. Ask anyone with Editor status to turn on Suggesting mode by clicking the pencil icon at the right end of the toolbar above the document, then selecting Suggesting from the drop-down menu. (Anyone who has Commenter rights for a document will automatically be in Suggesting mode when they open it in Docs.)

With Suggesting mode turned on, suggested changes appear next to the original text or image rather than obscuring it.
Howard Wen / Foundry
Under Suggesting mode, any text added to your document by a collaborator appears as a particular color, and each collaborator gets a different color. If they add an image, the border of that image will be the same color as their text color. Anything they delete will have a strikethrough in their assigned color.
Note cards will appear to the right of your document; each lists a change made to your document, who made it, and when the changes happened. To accept the suggestion on a card, click the checkmark; to reject it, click the x.
You can accept or reject each suggested edit.
Howard Wen / Foundry
To view your document with or without all the edits suggested by your collaborators: From the menu bar, click Tools > Review suggested edits.
A box will open at the upper-right corner. To view your document with the suggested edits merged in, click Show suggested edits and select Preview “Accept all” from the drop-down menu. To view without the suggested edits, select Preview “Reject all.”
To accept or reject all suggestions at once: You can click the Accept All or Reject All buttons on this pane.
Whenever your document gets a suggested edit by a collaborator, an updated tally appears next to its filename on your Google Drive home page and in the Drive, Docs, Sheets, and Slides mobile apps. If you’re viewing your Google Drive page in Grid view, this tally appears over the thumbnail of your document.
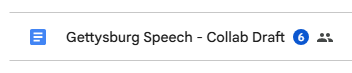
This shared file has 6 suggested edits.
Howard Wen / Foundry
Collaborating on documents in real time
When you and one or more of your collaborators are viewing a document at the same time, their headshot or the icon for their user account will appear above the document, toward the upper right. They see your headshot or user account icon in the same area on their screen.
Whenever you or your collaborators add comments or make suggestions or edits in the document, the other people see the comments or these actions happen in real time.
You can chat with one another: Click the icon that’s directly to the right of the headshots of your collaborators. This opens a chat window in a side panel along the right of your document.
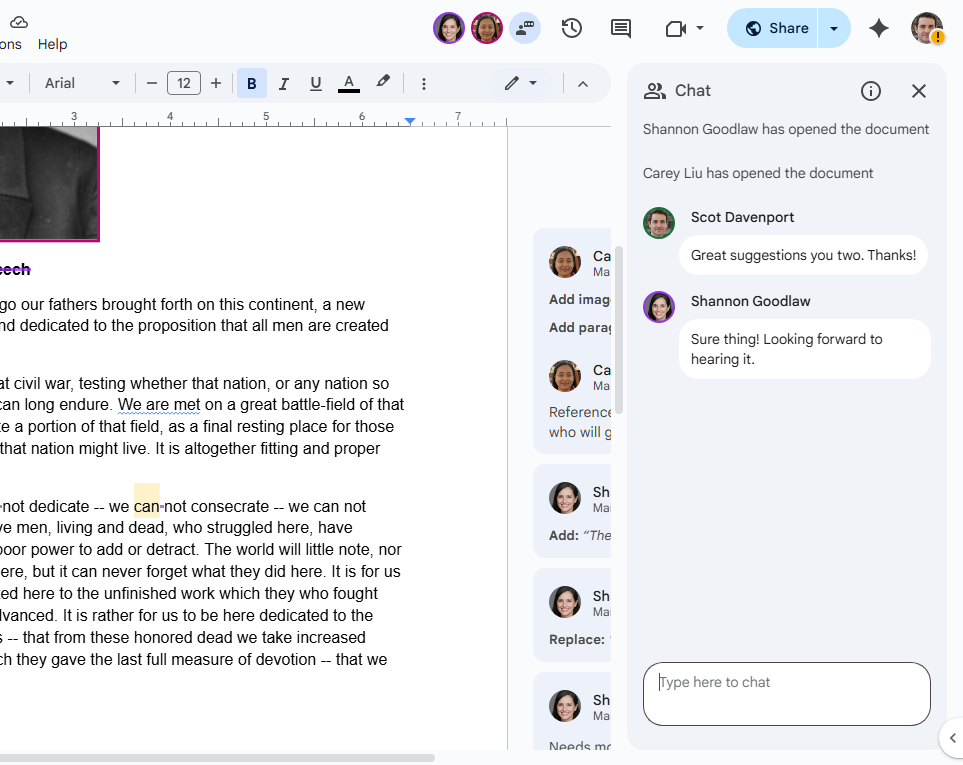
You can live-chat with colleagues as you work on a document together.
Howard Wen / Foundry
How to use shared drives
With most Google Workspace accounts, you can create shared drives. These work like your personal My Drive but can be accessed and managed by more than one person. Shared drives can be useful for storing and sharing documents that people collaborating on the same project, or working in the same department, need to use.
Creating a shared drive
If your organization supports shared drives, you’ll see a “Shared drives” item in the left column of your Google Drive home screen. To create a new shared drive, right-click Shared drives > New shared drive.
A pane opens prompting you to type in a name for your new shared drive. After you click the Create button, this new shared drive appears below “Shared drives.”
A new shared drive.
Howard Wen / Foundry
Adding other members to your shared drive
Next, you need to invite other people so that they can access the shared drive.
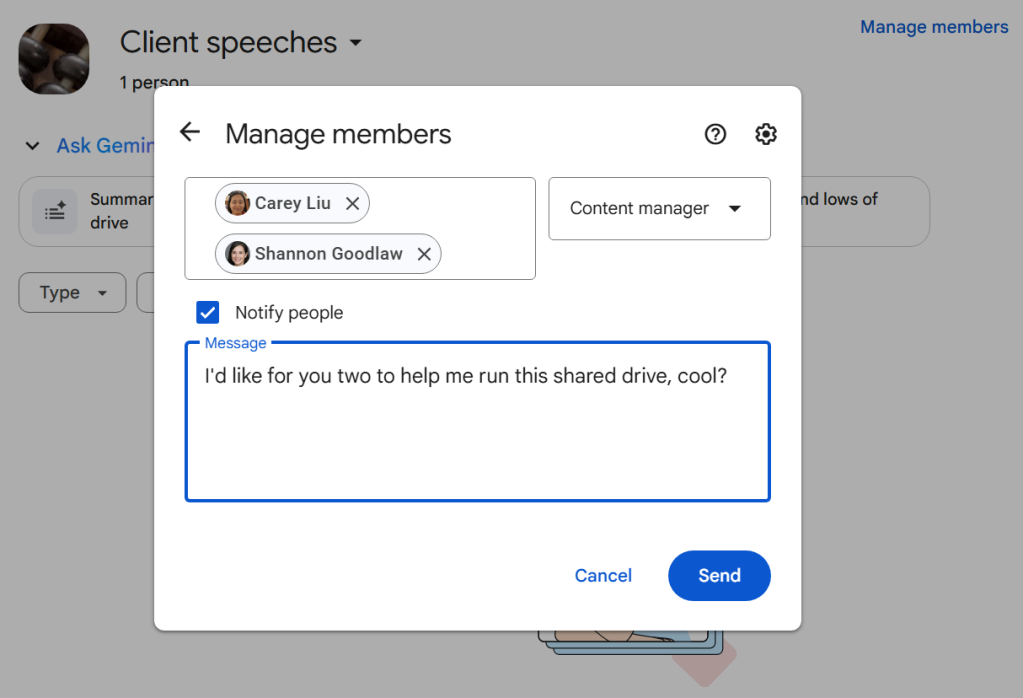
In the left column, double-click your shared drive. Click Manage members at the top of the page. In the pane that opens, enter the names or email addresses of your co-workers. Note that every person must have an account on your Google Workspace team or a Google user account.
Adding co-workers to a shared drive.
Howard Wen / Foundry
Click the Send button. These co-workers will get an email with a link that lets them access your shared drive.
By default, members you add to a shared drive will have Content manager access, which means they can upload, edit, move, or delete all files in the drive. But you can change the access level assigned to any member of the drive. Reopen the “Manage members” pane. To the right of each person’s name, you can click the Content manager dropdown to change the access level for that person. You can assign them to be a Viewer, Commenter, Contributor, or Manager instead.
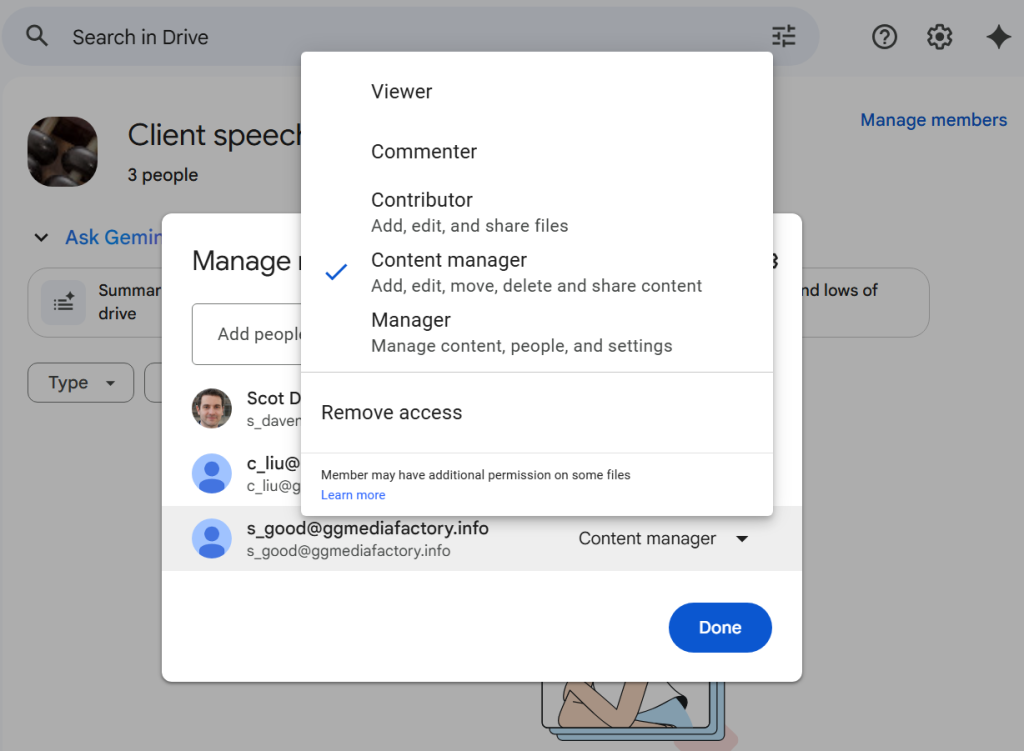
Assigning permissions for a shared drive.
Howard Wen / Foundry
There are several differences among these titles. (Google lists them in a handy table.) Managers have full control over documents and other people’s access to the shared drive. Viewers can only view documents and open folders in your shared drive. The other three roles fall in between, with varying degrees of control over the shared drive and its contents.
Any member of the shared drive can access any document stored in it, and (depending on their access levels) multiple members can add documents and folders to the shared drive. For groups of people who need to access and collaborate on multiple documents, a shared drive is much more manageable than sharing documents or folders from their personal My Drives.
Sharing documents (or folders) in a shared drive with non-members
Sometimes you want to share a document or folder with people outside the team — without giving them access to the whole shared drive. Sharing a document or folder in a shared drive with somebody who is not a member is mostly the same process described earlier for sharing a document in My Drive. The main differences to keep in mind are these:
- To share a document in a shared drive, you or a member of your shared drive must have at least Contributor access level. To share folders, you or the other member must have Content manager access.
- Whether you share a folder privately with a non-member or create a publicly accessible web link to it, you can choose one of these user access levels for it: Viewer, Commenter, Contributor, Content manager, or Manager.
For more information about working with shared drives, see Google’s “Get started with shared drives” page.
This article was originally published in October 2017 and most recently updated in December 2025.
Related reading:
www.computerworld.com (Article Sourced Website)
#collaborate #Google #Drive #Docs #Sheets #Slides