


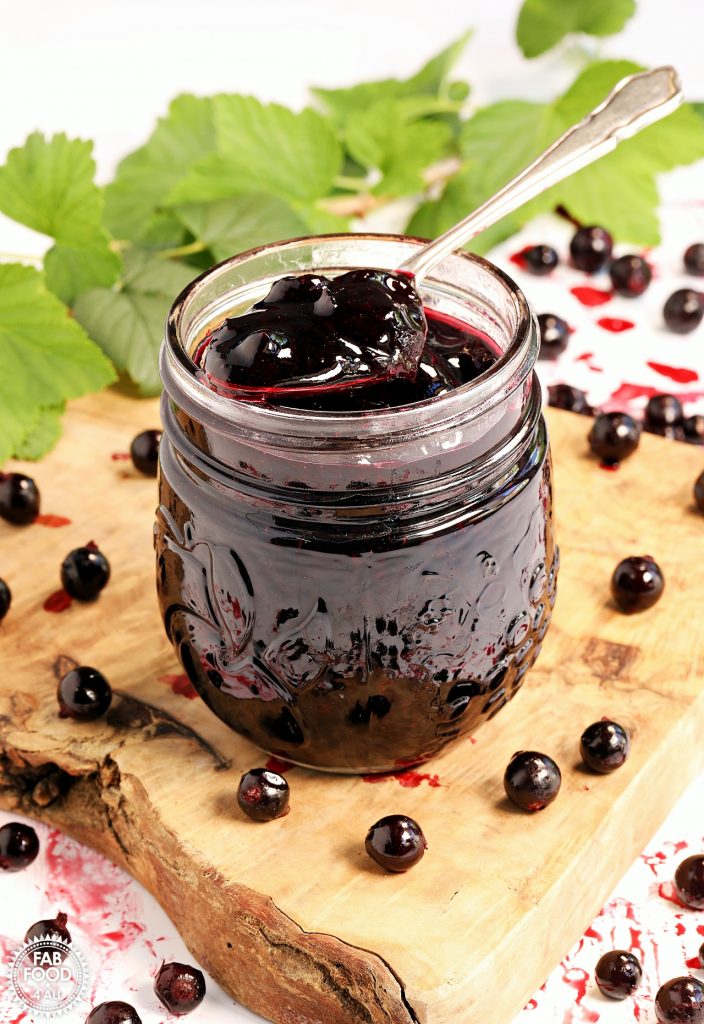
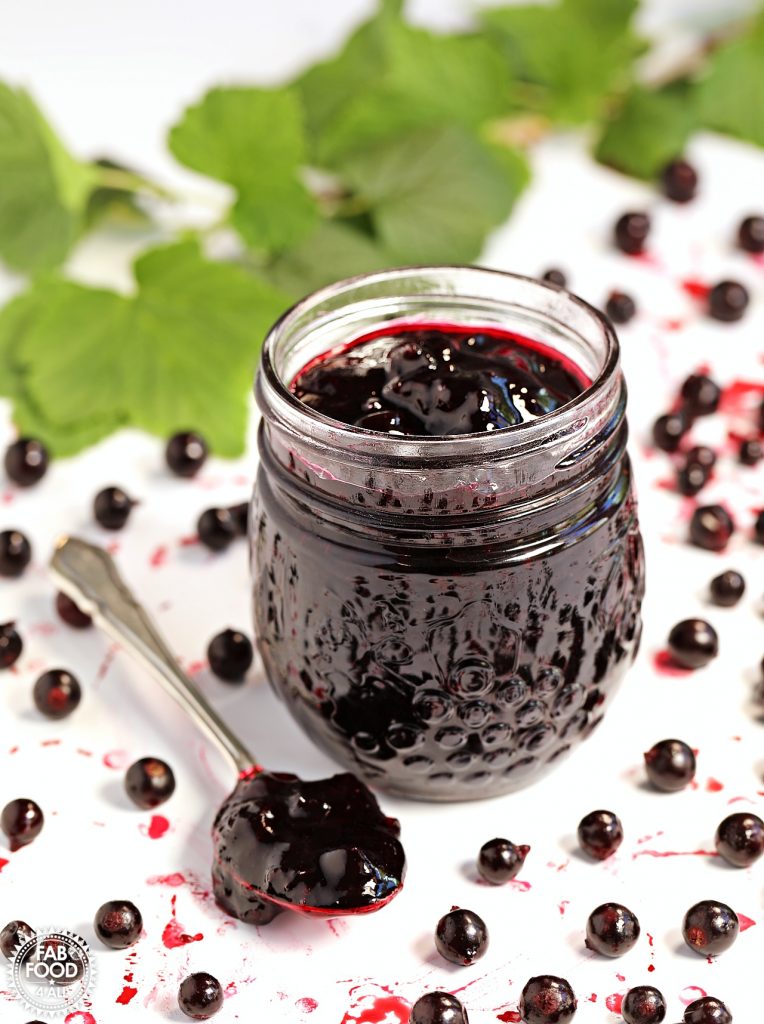
Quick and Easy Blackcurrant Jam is made with just two simple ingredients: blackcurrants and sugar. You can create this rich, tangy, and beautifully glossy jam in under 20 minutes.
Bursting with natural flavour and packed with vitamin C, blackcurrants are naturally high in pectin. Hence, this jam sets perfectly without the need for added lemon juice or commercial pectin.

Easy Blackcurrant Jam Recipe Back Story
Blackcurrant jam is the first jam I can remember making in my late twenties. Newly married and with our first house and garden, I planted a blackcurrant bush.
After a prolific harvest, I set about making blackcurrant jam. I don’t remember which recipe I used.
It either had added lemon juice/zest or there wasn’t enough sugar, as it was just too tangy/tart for my liking.
So I had been meaning to revisit blackcurrant jam for a couple of years to see if I could change my perception of this popular jam.

However, each summer I’d somehow miss blackcurrant season at the local farm and in the only supermarket that sold them.
So, fast forward to this summer, when the blackcurrant bush I’d bought for our current house finally produced a small harvest.
As the blackcurrants ripened, I washed, dried, and open froze them on a tray before bagging them up into a reusable freezer bag.
It was time to create a blackberry jam recipe that I liked! I decided to use a high proportion of sugar with water and no lemon to avoid making the jam overly tart in flavour.
The resulting jam was and is out of this world good. Intensely fruity, sweet, and tart (but not overly so), this blackcurrant jam is something special!

A Few Blackcurrant Facts
Raw blackcurrants have a very tart taste with only a hint of sweetness. Testament to this is the fact that the birds in my garden leave them alone!
Blackcurrants are native to northern Europe and northern Asia.
Harvest time in the UK is anywhere between June and August.
Around 95% of the UK’s blackcurrants are used for making Ribena, which is probably why they’re so hard to come by!
America banned the blackcurrant in the early 1900s as it spread a fungus which threatened their timber industry. They only lifted the ban in some states in 2003.
Blackcurrants contain 3 times as much vitamin C as oranges and are packed with fibre, potassium, antioxidants, and anthocyanins. Even after cooking, blackcurrants retain a lot of their vitamin C.

Fresh or Frozen? Choosing Blackcurrants for Jam Making
It’s best to use just ripe blackcurrants. Freshly picked or freshly picked and frozen blackcurrants will have the highest fruit pectin content. Pectin is what sets the jam.
Blackcurrants are naturally high in pectin, and like all fruit, this diminishes with age as the fruit gets riper.
So bear this in mind when boiling the jam, as less pectin equals a longer boiling time.
I was quite taken aback that my blackcurrant jam took only one and a half minutes to reach setting point! The pectin must have been at its highest when I picked my blackcurrants.

The blackcurrant season is so short that finding fresh ones for sale can be hard. Blink and the season has gone!
As my harvest only weighed just under 300 grams, I had the tenacity to buy frozen mixed berries and pick out the extra weight of blackcurrants that I needed.
If you’ve missed blackcurrant season and eat mixed frozen berries, then picking enough out to make jam is an option if you don’t grow your own!
Sadly, frozen blackcurrants aren’t sold on their own in UK supermarkets.

Prepping Blackcurrants for Jam Making
I find a salad spinner is a great tool for washing blackcurrants as you can pop them into the inner basket, fill it with water, and then agitate to remove any dirt and debris. You can then lift out the basket and allow the blackcurrants to drain before spinning dry.
Stems can be removed by running a fork down them if necessary, which should also remove the stalks. Just be sure to remove all signs of stalk, as they are bitter.
At the opposite end of the stalk, you’ll see a brown papery cluster that was the flower.
These dead flowers should be left on, as you won’t notice them in the jam. Plus, it would take you forever to remove them all!
However, I do have memories of cutting these off with nail scissors the first time I made blackcurrant jam, as I didn’t know any better!
If you’re using store-bought frozen blackcurrants, then you won’t need to do any prep.

How to Make Easy Blackcurrant Jam
Ingredients

- Fresh Blackcurrants – or frozen (no need to thaw).
- Granulated Sugar – not preserving sugar, as there is more than enough pectin in the blackcurrants.
- Water – needed for cooking down the blackcurrants to soften the skins. It also increases the jam yield as there is more than enough pectin to set the extra water.
Equipment
- Digital Scales – because you can’t convert a weight to a cup where fruit is involved.
- Digital Thermometer (optional) – to take the guesswork out of reaching the setting point, and is necessary if scaling up the recipe.
- Preserving Pan – or similar-sized large saucepan.
- Long wooden spoon – for reaching to the bottom of the pan and not burning your hand from the steam.
- 2 to 3 Saucers or small plates – for the chilled plate test to see if the setting point has been reached.
- Jam Funnel – keeps spills at bay.
- Ladle – for potting up.
- 4 x 250 ml (8 oz) Jam jars and lids (canning jars) – or equivalent in smaller or larger jars.
Instructions
Find full instructions in the recipe card at the end of this post.
- Place the blackcurrants and water into a preserving pan.

- Bring to a boil slowly (on medium heat), then lower the heat and simmer for 10 minutes to soften the frozen or fresh berries. (If you’re not keen on whole fruit in your jam, then you could use a potato masher to squish the blackcurrants at this stage, but I didn’t.)

- Add the granulated sugar.

- Stir until the sugar has completely dissolved.

- Turn the heat up and bring the pan to a rolling boil. From this point time for 1 minute, or if you have a digital thermometer, boil until the temperature reaches 104.5°C / 220.1°F. Mine took 1 minute and 30 seconds to reach this temperature.

- Remove the pan from the heat. Test for set by putting a few drops of jam onto a cold saucer and placing it in the fridge for 30 seconds.

- Push a finger through the jam, which should crinkle if it’s reached the setting point.

- If the setting point hasn’t been reached, continue boiling for 30 seconds at a time and retest until the setting point is reached.
- Remove any scum from the jam by stirring vigorously with a wooden spoon.

- Use a ladle and a jam funnel to pot up the hot jam into the 4 hot sterilised jars.

- Screw the lids on immediately and allow to cool.


Serving Suggestions for Easy Blackcurrant Jam
There are so many ways that you can serve this blackcurrant jam.
- Spread it on your favourite carb, eg, sourdough toast, scones, muffins, crumpets, croissants, or the Lemon & Raisin Scotch Pancakes in the photographs. Top with a blob of Greek yogurt for extra yumminess!
- The first thing my daughter did was to swirl a spoonful into some full-fat Greek yogurt, which I can confirm tastes amazing. You could also stir it into porridge, semolina, or rice pudding.
- Use it to sandwich layered cakes together, eg, Victoria Sandwich.
- Add to cakes, muffins, cookies, steamed puddings, etc.
- Dollop onto some vanilla ice cream.

Shelf Life & Storage
Blackcurrant Jam should be kept in a cool, dry, dark place (I keep mine in a cupboard in my garage).
It is best consumed in the first 12 months, but it will be shelf-stable for many years.
Once opened, store it in the fridge where it will keep for many months, if not longer. Always serve jam with a clean spoon to avoid cross-contamination.
More Summer Jam Recipes
Once you’ve made my blackcurrant jam, here are some more summer jams you should try:
Frequently Asked Questions
Yes. Whatever weight you have of blackcurrants, multiply it by 150% to get the weight of sugar. Then use 25% of the total figure (blackcurrants and sugar) for the water, which will be in milliliters. Eg, 1000 g of blackcurrants, 1500 g sugar, plus 625 ml water. Bear in mind that you’ll need to boil the jam for a longer time, so use a digital thermometer to determine when the setting point is reached.
This will depend on a few factors, eg, how long you simmer the blackcurrants for to soften the skins. My batch made just shy of 4 x 250 ml (8 oz) jars.
No, the recipe is shelf-stable as written. If you prefer to water bath, follow the instructions provided by your jar manufacturer.
No, use the frozen blackcurrants as if they were fresh; there’s no need to thaw.
No. If you were to boil the sugar and blackcurrants together without pre-boiling, it would result in tough blackcurrants as the sugar draws out the moisture.

I hope I’ve inspired you to make my homemade blackcurrant jam recipe, as I’m sure you’ll love it as much as my family does!
Both the Blackcurrant Jam and my Lemon & Raisin Scotch Pancakes (served with a dollop of Greek yogurt) got a 10 out of 10 from everyone!
I highly recommend making a larger batch and using it as gifts for friends and family!
Pin this Easy Blackcurrant Jam recipe for later!

Leave a comment and rating below when you’ve made this recipe; I love getting your feedback! You can also share your pictures by tagging @FabFood4All over on Instagram.
Easy Blackcurrant Jam Recipe (No Pectin)
This quick and easy blackcurrant jam recipe is made in under 20 minutes with just 2 ingredients. Intensely rich, tangy and fruity, it’s the taste of summer in a jar.
Equipment
Preserving pan or similar sized pan
Digital scale
Measuring jug
Digital thermometer
long wooden spoon
2 – 3 saucers/small plates
jam funnel
ladle
4 x 250 ml (8 oz) glass jars with lids
Ingredients
- 400 g / 14 oz washed & stemmed blackcurrants fresh or frozen
- 250 ml / 1 cup water
- 600 g / 3 cups granulated sugar
Instructions
Before you start, see Notes 1 and 2 below.
Place the blackcurrants and water into a preserving pan or similar.
Bring slowly to a boil (on a medium heat), then lower the heat and simmer for 10 minutes or until the blackcurrant skins are well softened. Test by piercing or rubbing a cooled berry between your fingers. (If you’re not keen on whole fruit in your jam, then you could use a potato masher to squish the blackcurrants at this stage, but I didn’t.)
Add the granulated sugar over a low heat and stir until completely dissolved. The mixture must not bubble, or this will result in crystallised jam. When you drag a wooden spoon over the base of the pan, there should be no crunching sounds.
Turn the heat up to high and bring the pan to a rolling boil. From this point time for 1 minute, or if you have a digital thermometer, boil until the temperature reaches 104.5°C / 220.1°F. Mine took 1 minute and 30 seconds to reach this temperature. See Note 3 below.
Remove the pan from the heat and test for set (even if you’ve used a thermometer) by placing a few drops of jam onto a chilled saucer and placing it in the fridge for 30 seconds. Then push a finger through the jam, which will crinkle if it’s reached the setting point.
If the setting point hasn’t been reached, continue boiling the jam for 30 seconds at a time and retest until it reaches the setting point.
Eradicate any scum (air bubbles) from the jam by stirring vigorously with a wooden spoon until it dissipates.
Pot up the hot jam using a ladle and jam funnel into hot sterilised jars. Allow to cool before labelling and serving. See FAQs for storage advise.
Notes
- Place 2-3 saucers/plates in the freezer for the chilled plate test.
- Sterilise 4 x 250 ml (16 oz) jars and lids (or variation thereof). Start by washing the jars in hot soapy water (or take them straight from the dishwasher). Then fill with boiling water, empty, and place in the oven for 20 minutes at 140°C, 120°C fan, 284°F, gas mark 1. Leave the jars in the oven until the jam is ready to pot up. Washed lids should be sterilised by immersing in boiling water and then left to drain.
- I would usually advise stirring with a wooden spoon, but this jam was ready so quickly that it didn’t seem necessary. If you’re making a larger batch, which will take longer to boil, then definitely stir regularly to avoid the sugar burning on the base of the pan.
www.fabfood4all.co.uk (Article Sourced Website)
#Easy #Blackcurrant #Jam #Pectin