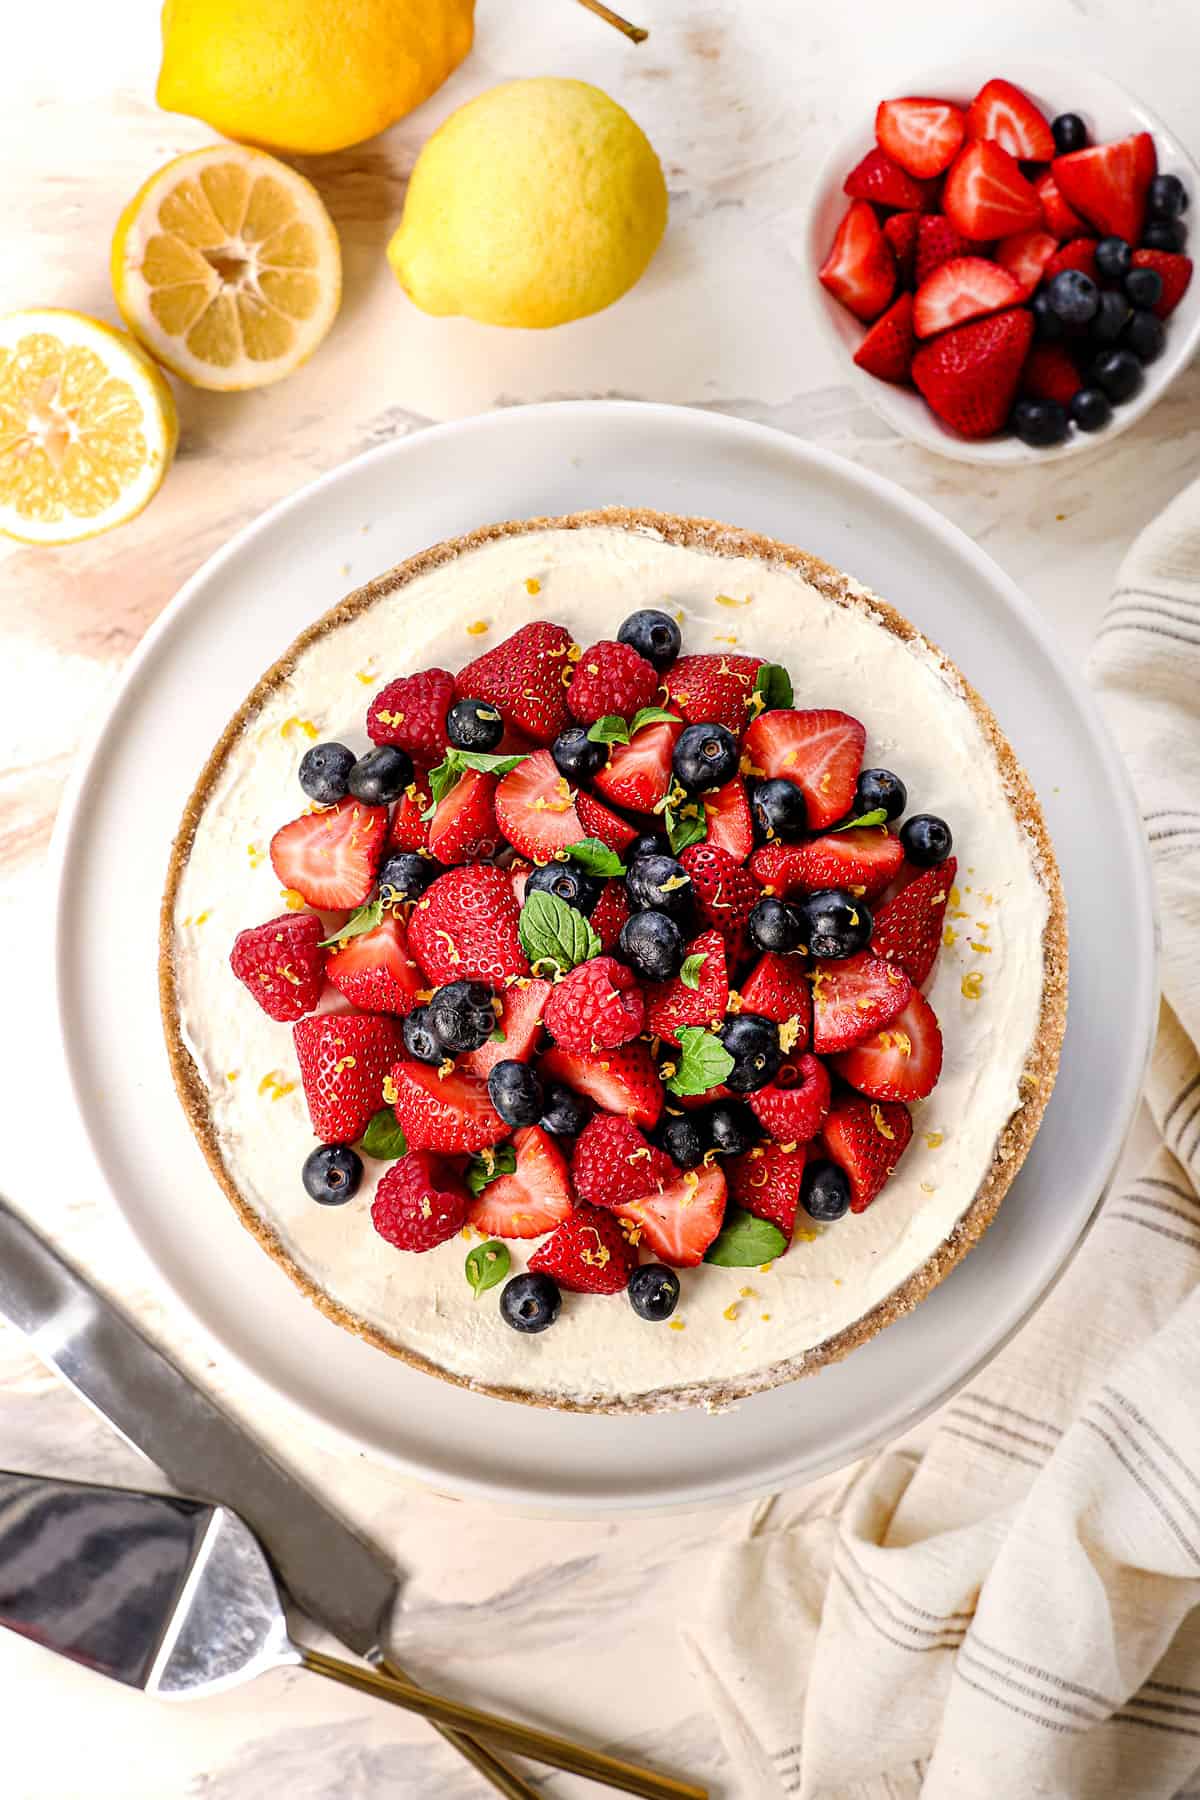
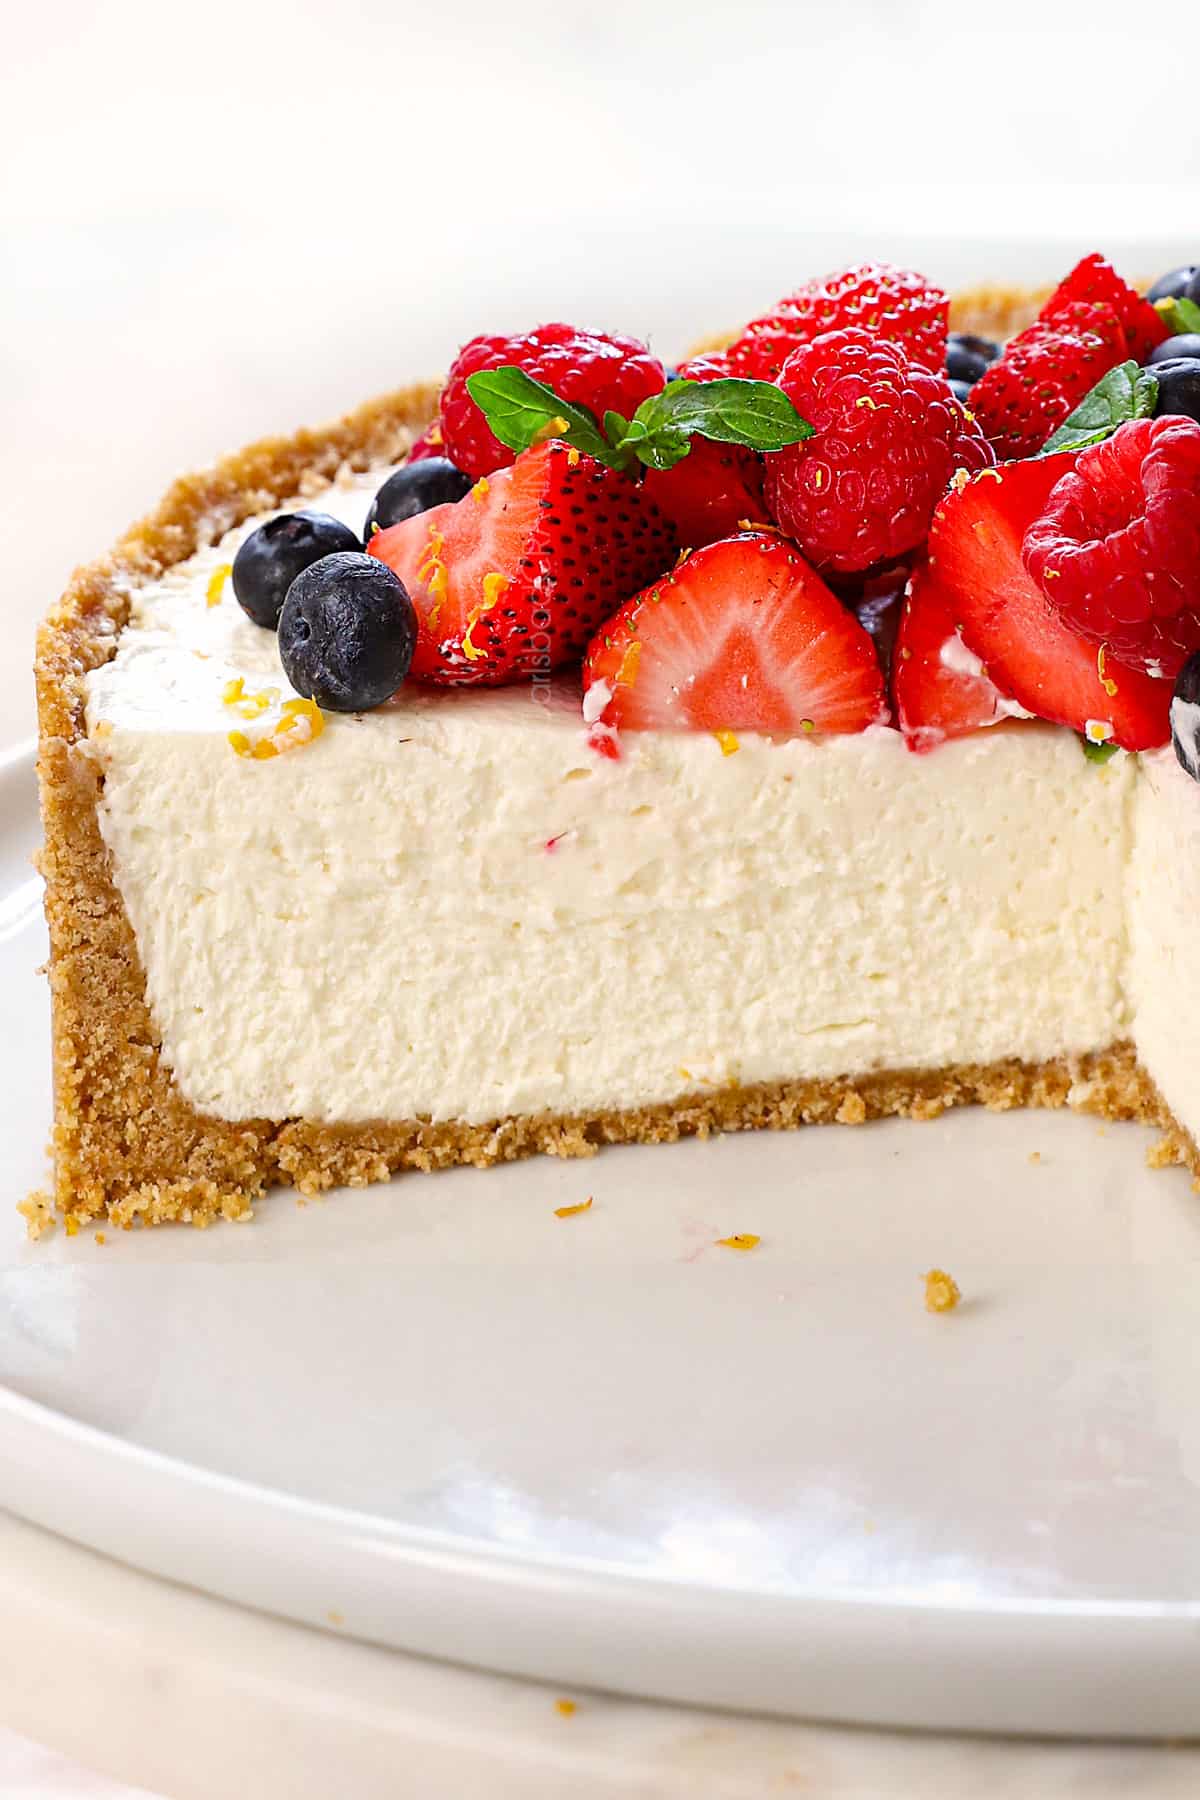
This is hands-down the most OUTRAGEOUSLY DELICIOUS No-Bake Cheesecake recipe—you won’t believe it’s no-bake! Thanks to my game-changing secret ingredient, it creates tall, clean slices that don’t melt, while boasting a smooth, light yet luxuriously velvety texture and perfectly balanced flavor. Additionally, I’ve included expert tips, foolproof techniques, step-by-step photos, and numerous variations to ensure your cheesecake turns out perfectly every time!

Easy No Bake Cheesecake Recipe 🍰
This No-Bake Cheesecake isn’t just easy—it’s practically foolproof, and it’s far superior to other versions. I tested and retested the recipe with and without gelatin, using different quantities of cream cheese, sugar, sour cream, and other ingredients, until this perfect recipe was developed. Here’s why it stands out:
No Bake Cheesecake Recipe Ingredients
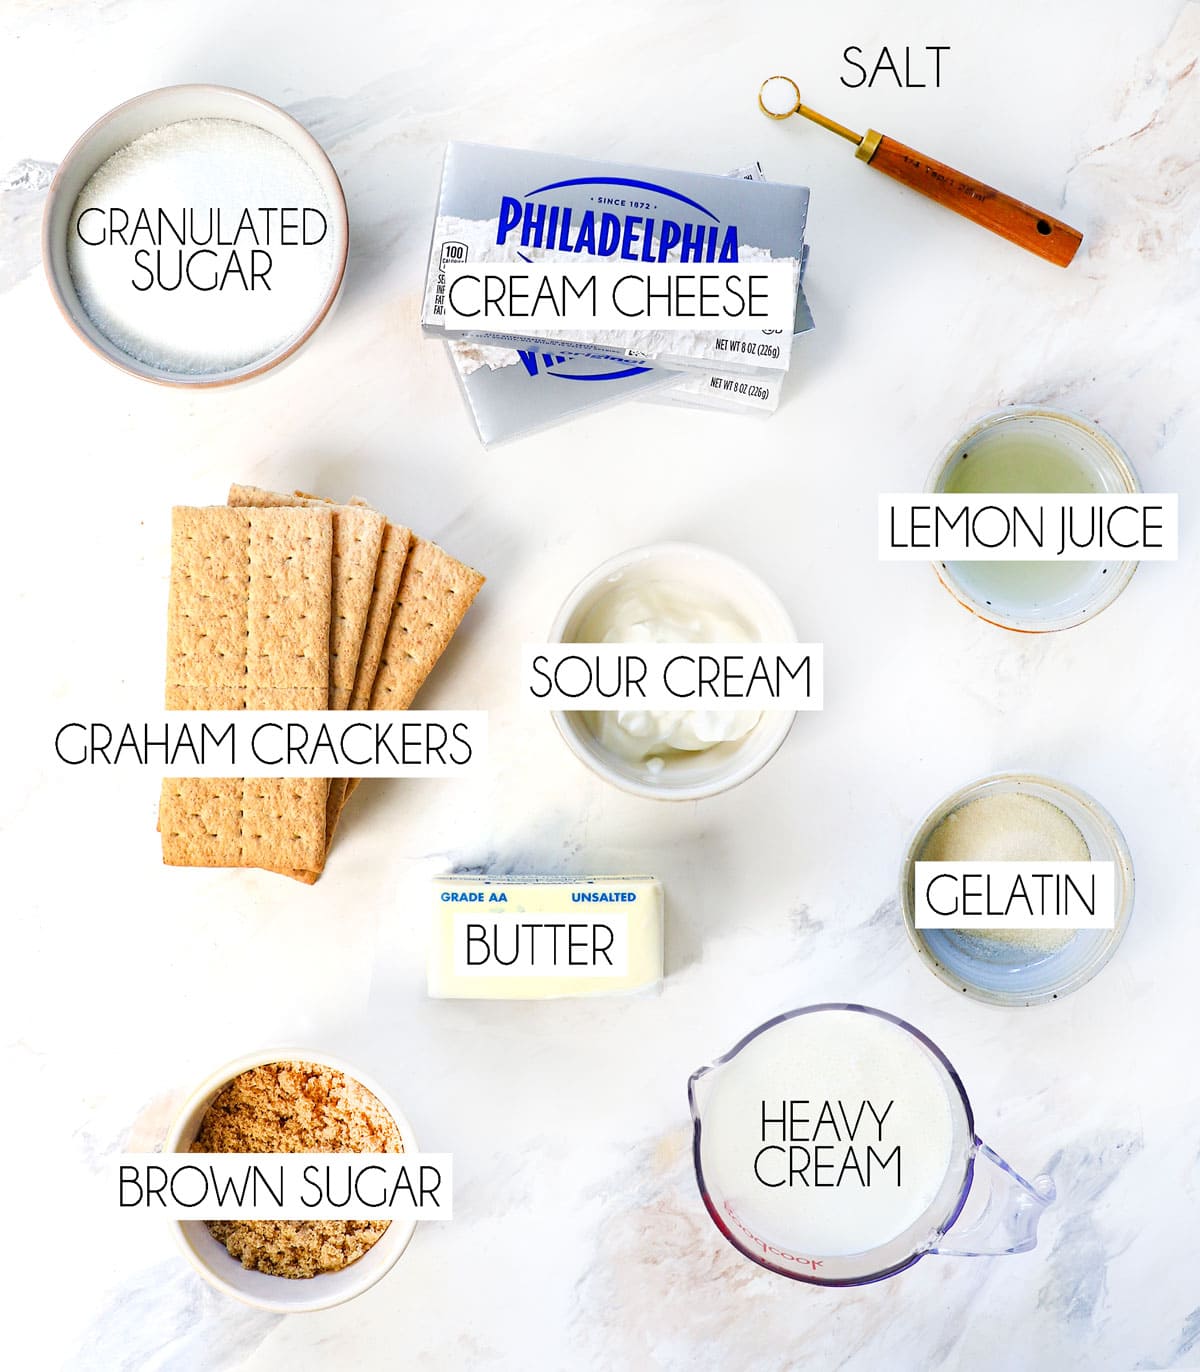
Let’s take a closer look at what you need to make this recipe (measurements in the printable recipe card at the bottom of the post):
FOR THE CRUST:
For the no bake cheesecake filling:
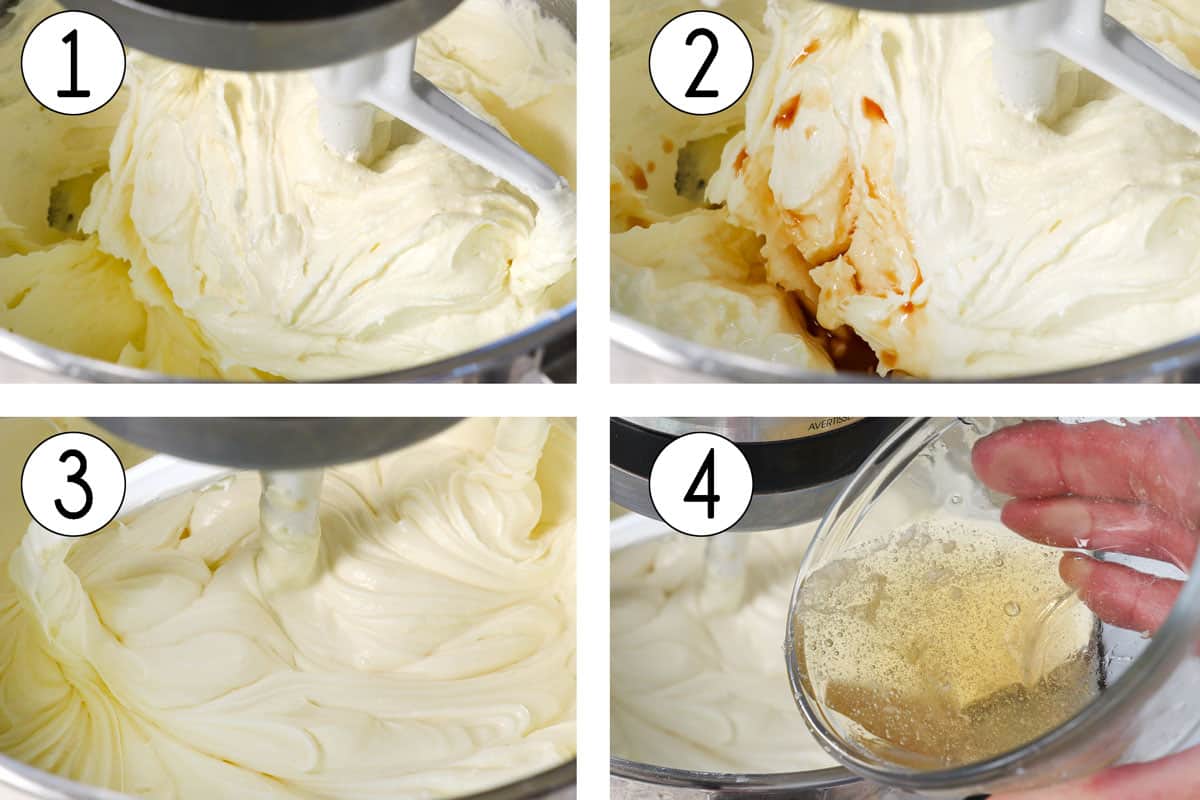
How to make Cheesecake (No Bake)
Let’s take a closer look at how to make this recipe with step-by-step photos (full recipe in the printable recipe card at the bottom of the post):


TIPS for making no bake cheesecake
Easy No Bake Cheesecake Variations
Because this recipe is no-bake, it is incredibly forgiving when it comes to variations—you can virtually add anything you like! Here are delicious mix-ins and flavor additions to suit any mood or occasion:
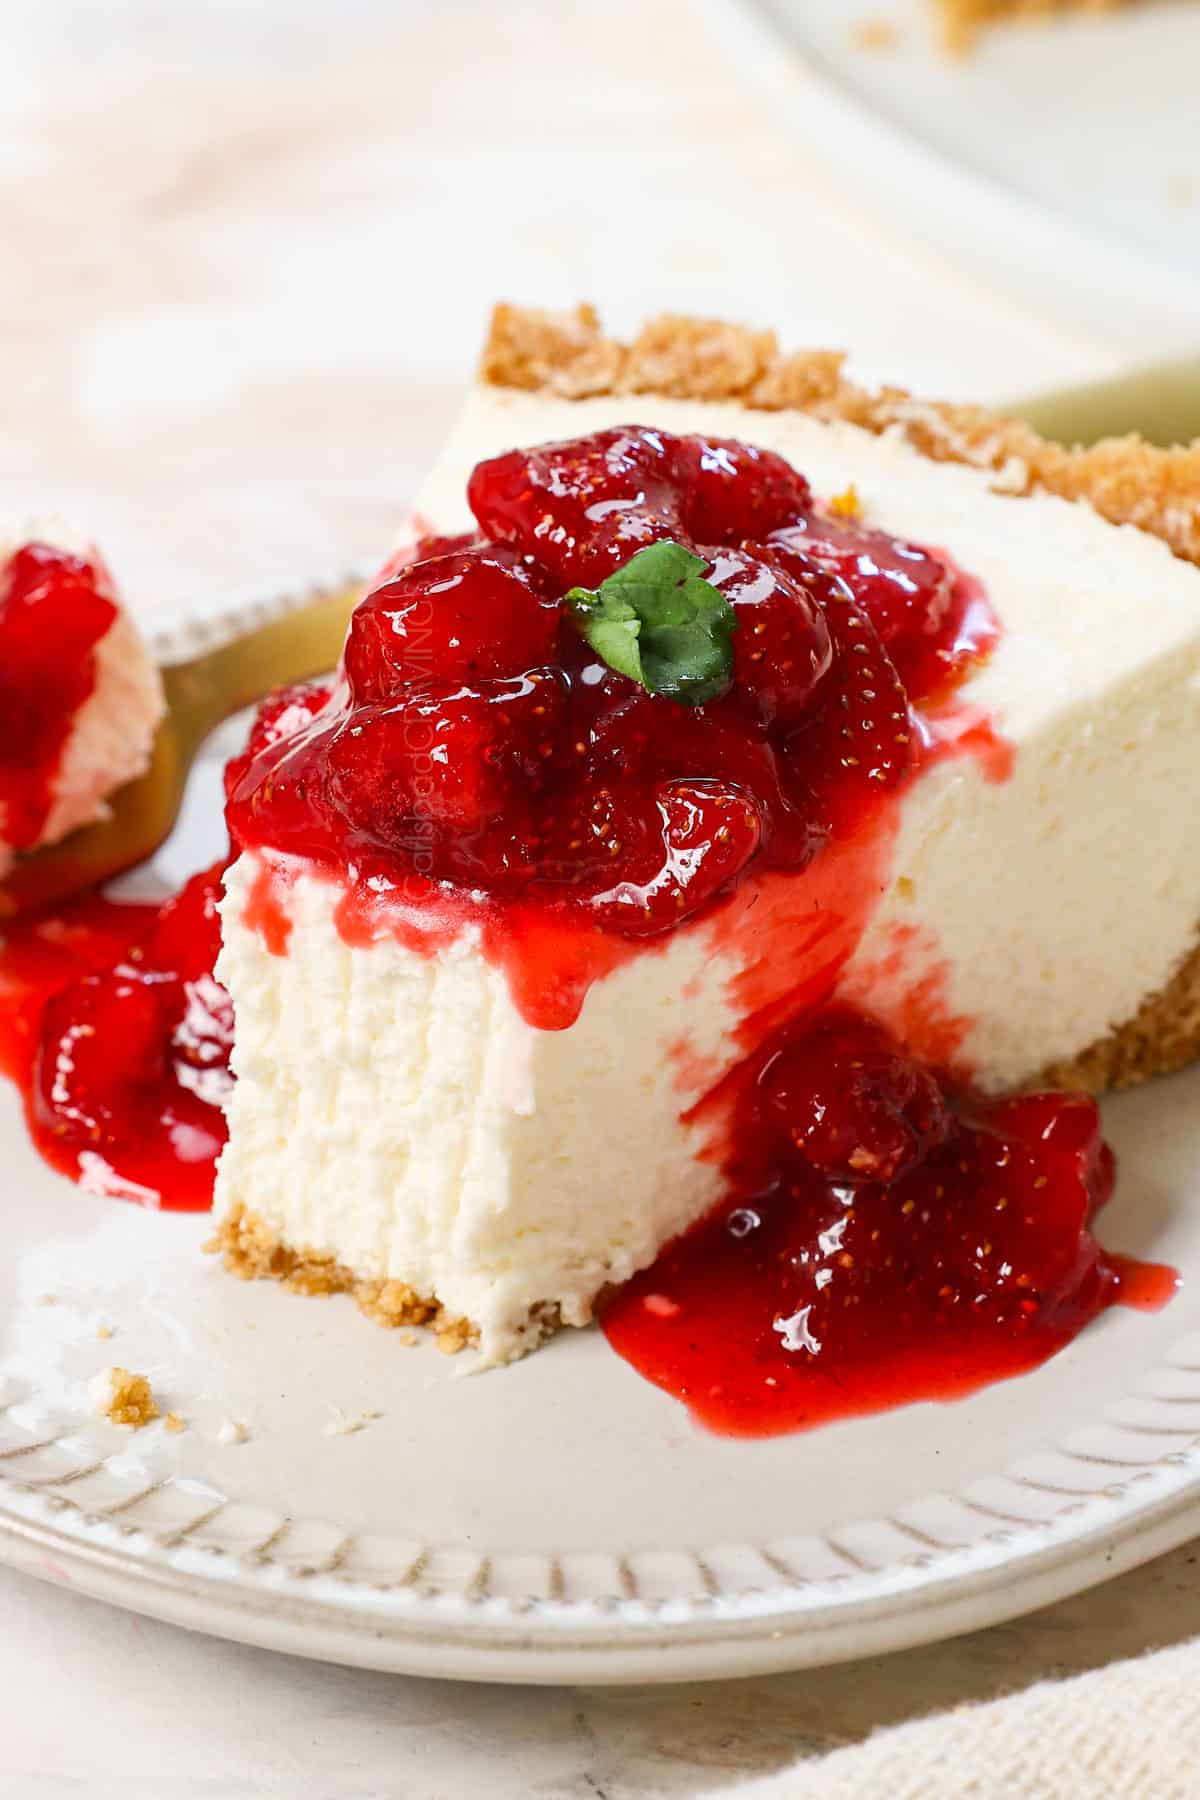
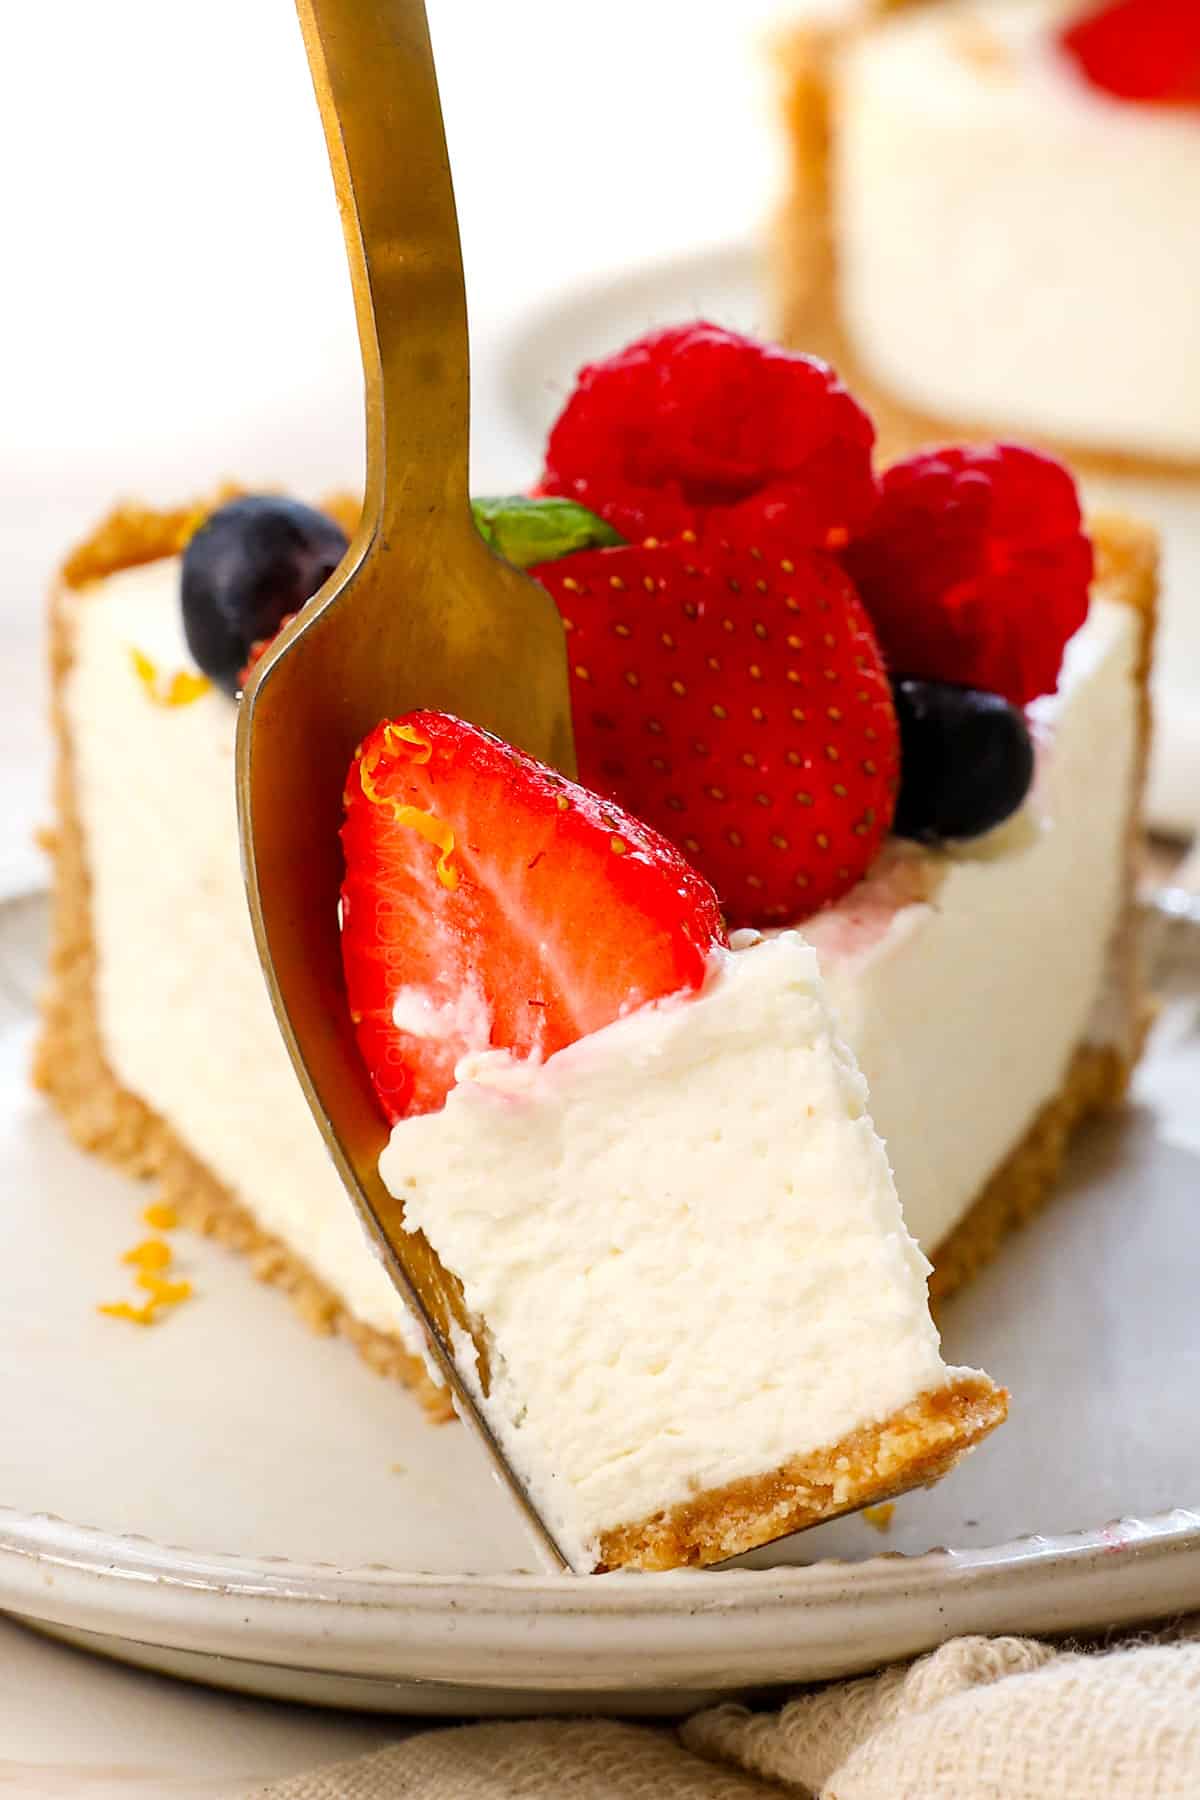
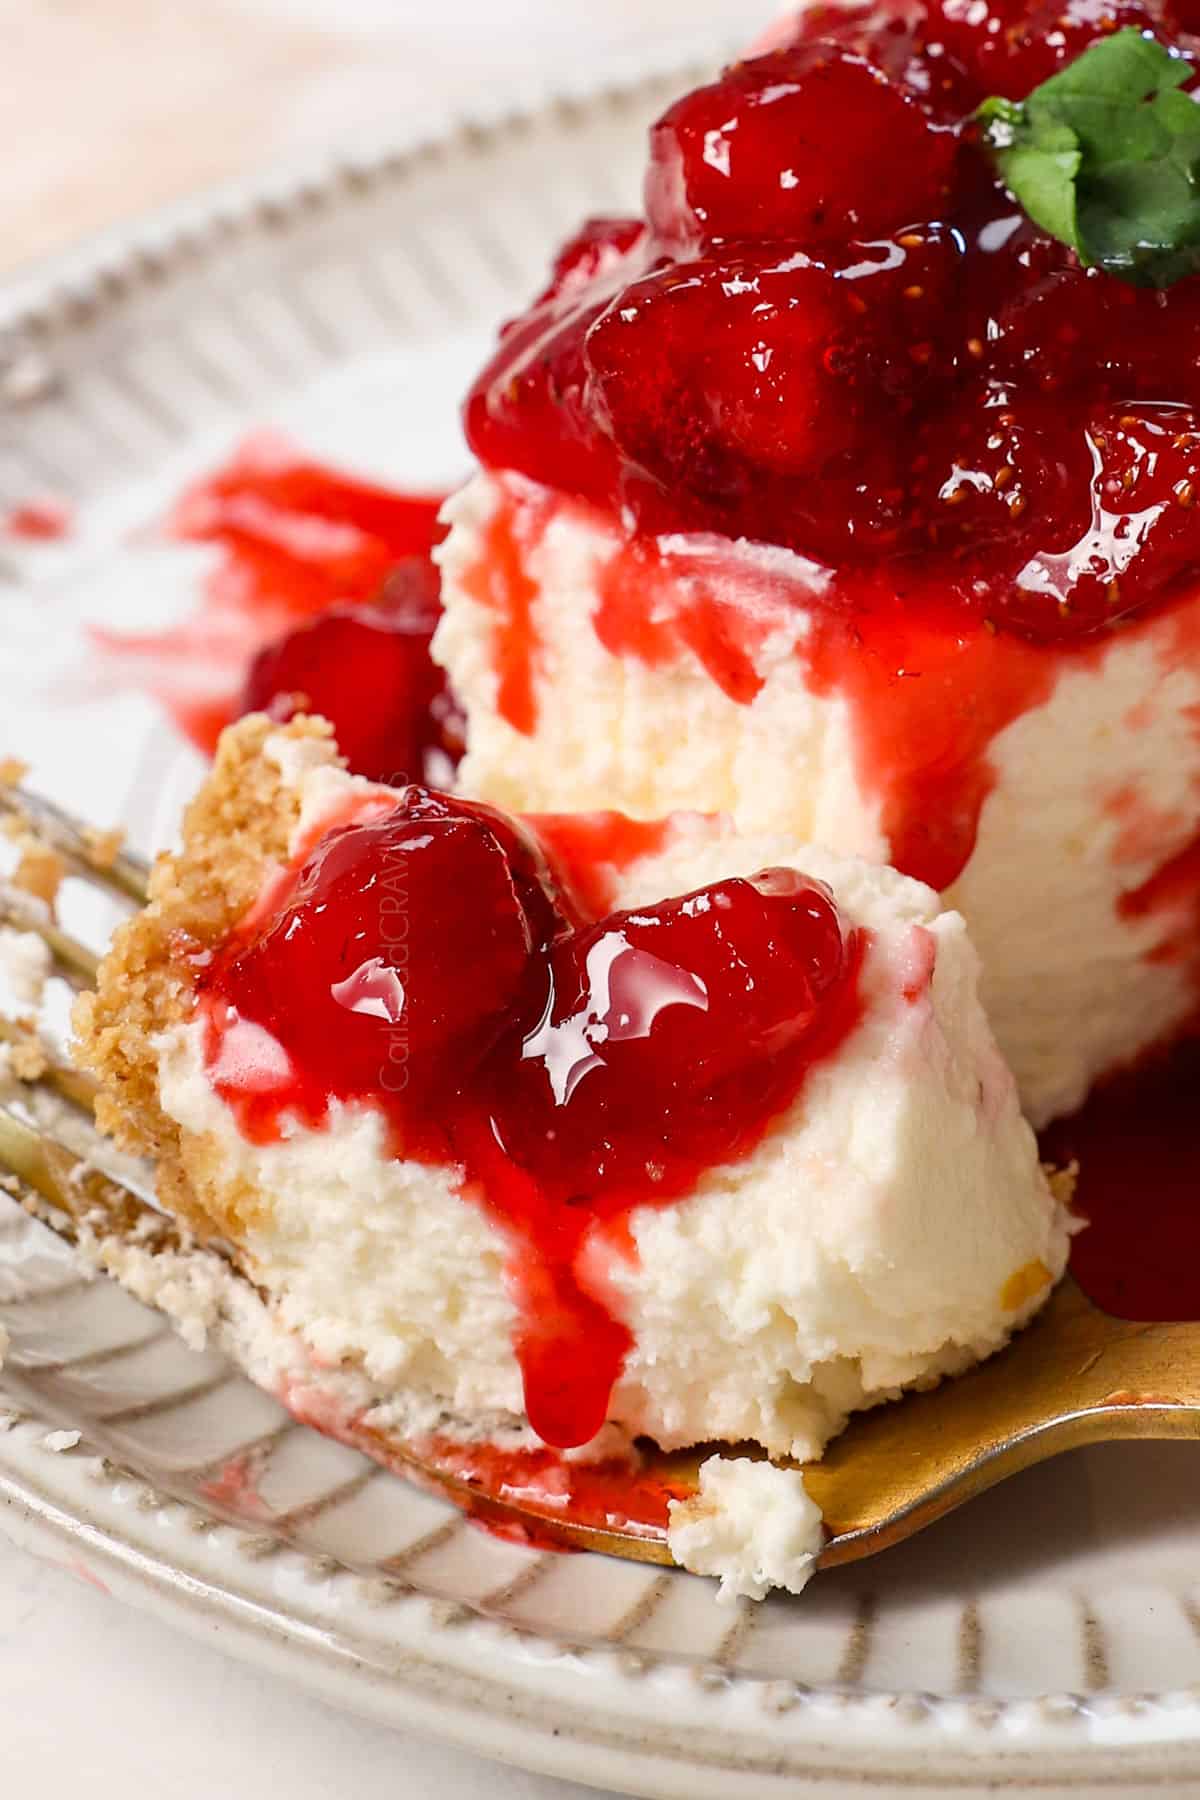
How to serve Easy No Bake Cheesecake
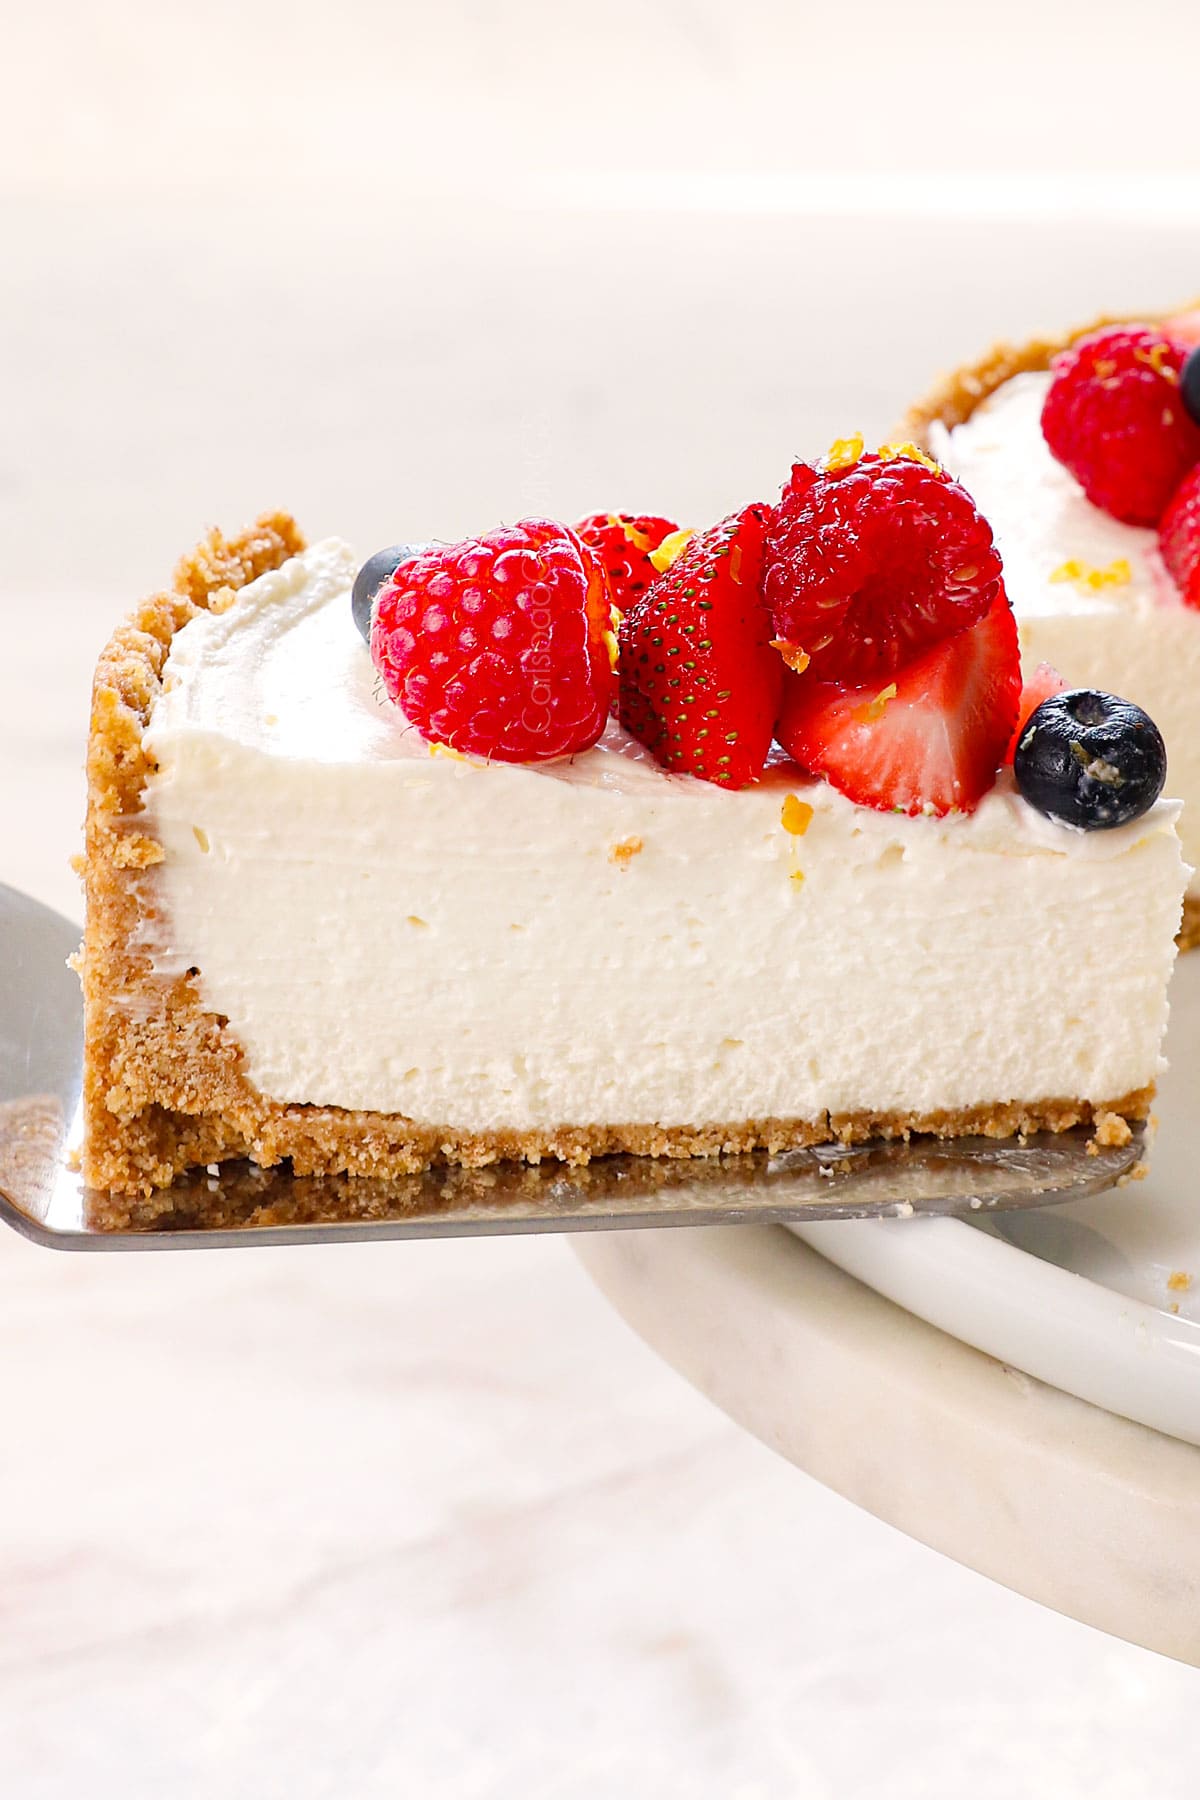
Remove it from the refrigerator and let it sit at room temperature for about 10–15 minutes for the smoothest texture. For clean, smooth slices, run a sharp knife under hot water, then wipe it dry before each cut. The heat helps the blade glide through the cheesecake without sticking or tearing. Serve plain or top with desired toppings (see below).
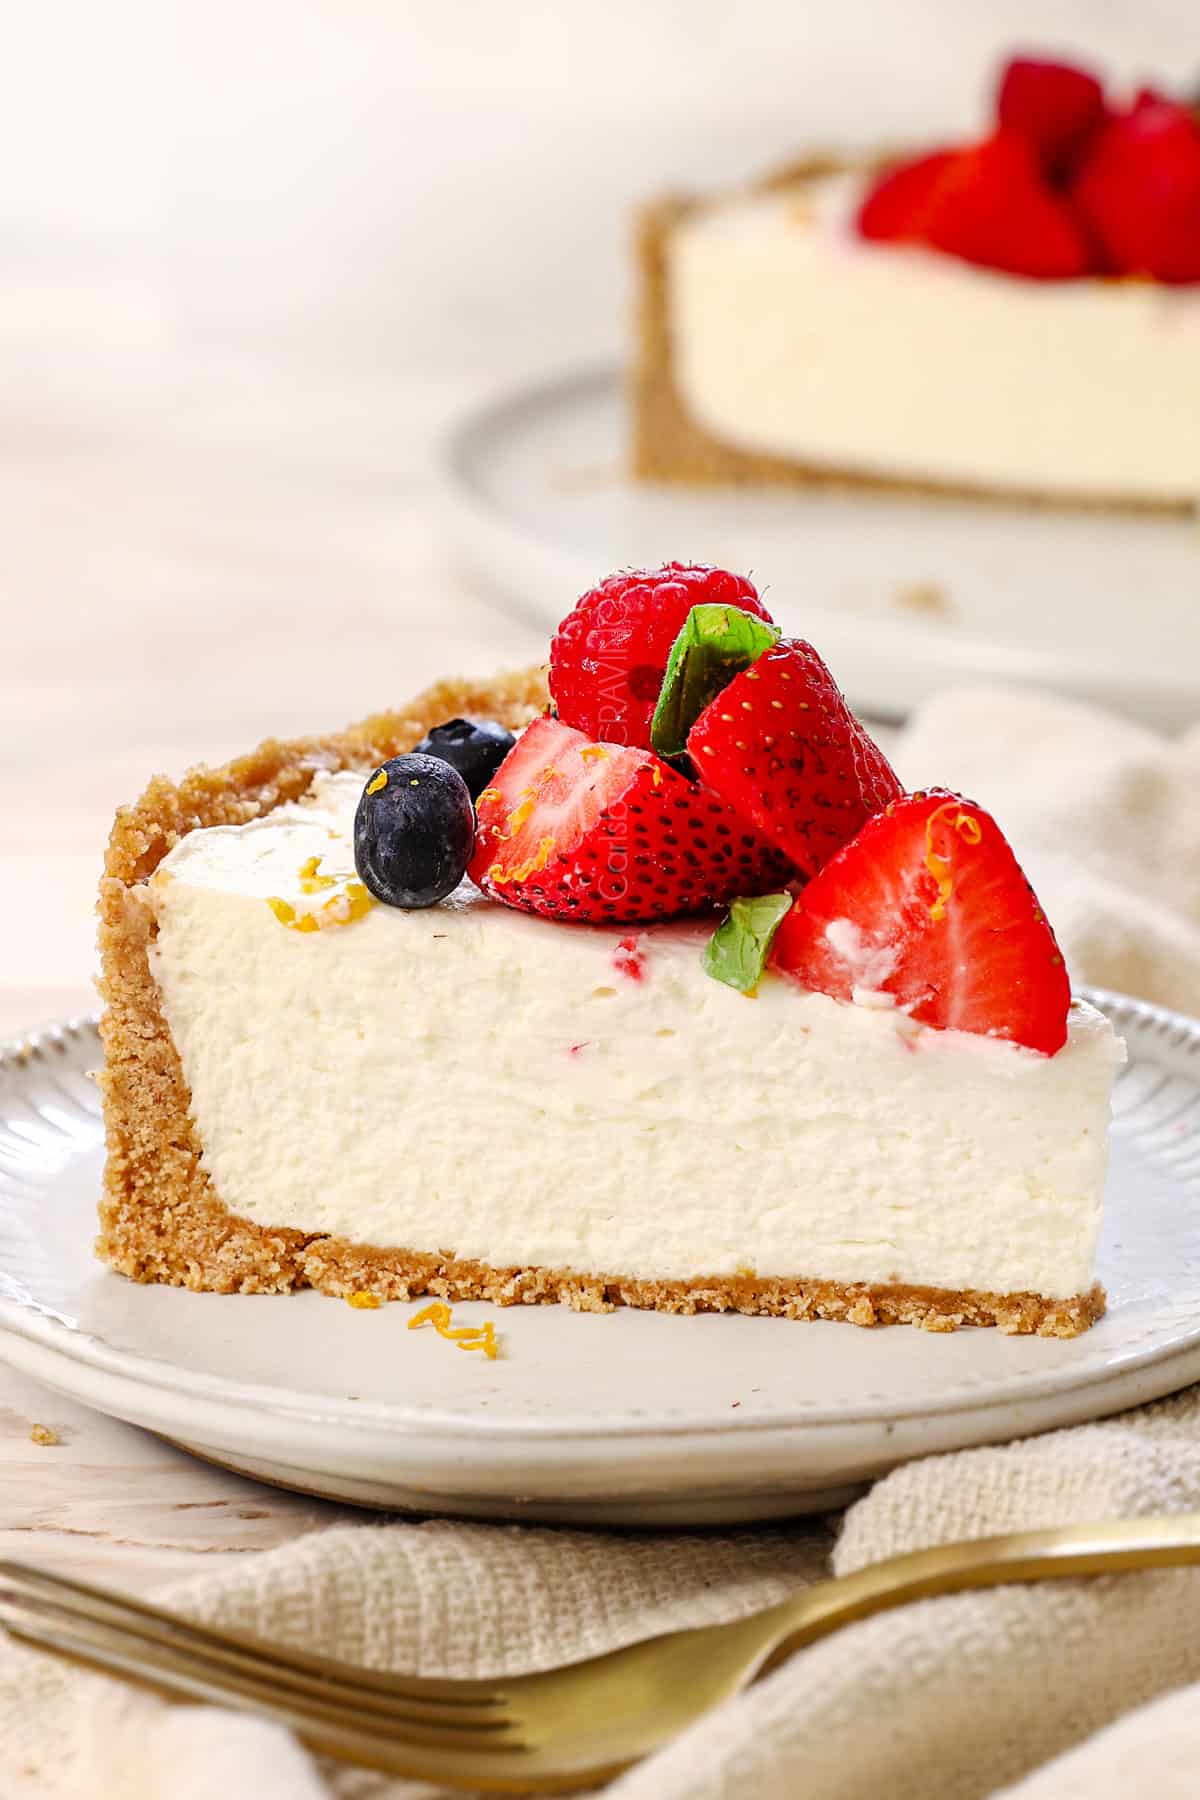
Light and Fruity toppings
Decadent & Crunchy toppings
WANT TO TRY THIS No Bake Cheesecake RECIPE?
PIN IT to your recipe BOARD TO SAVE FOR LATER!
FIND ME ON PINTEREST FOR MORE GREAT RECIPES! I AM ALWAYS PINNING :)!
©Carlsbad Cravings by CarlsbadCravings.com
Save This Recipe To Your Recipe Box
You can now create an account on our site and save your favorite recipes all in one place!
Crust
- 16 full sheets of Graham crackers (about 2 cups crumbs)
- 1/4 cup packed light brown sugar
- 1/2 cup (8 TBS/ 1 stick) unsalted butter, melted
- Pinch of salt
Cheesecake
- 1 tablespoon gelatin powder (see Notes)
- 3 tablespoons water
- 1 1/3 cups heavy cream
- 24 ounces full-fat brick cream cheese, softened
- 1 cup granulated sugar
- 1/2 cup sour cream, at room temperature
- 1 tablespoon lemon juice
- 2 teaspoons pure vanilla extract
- 1/4 teaspoon salt
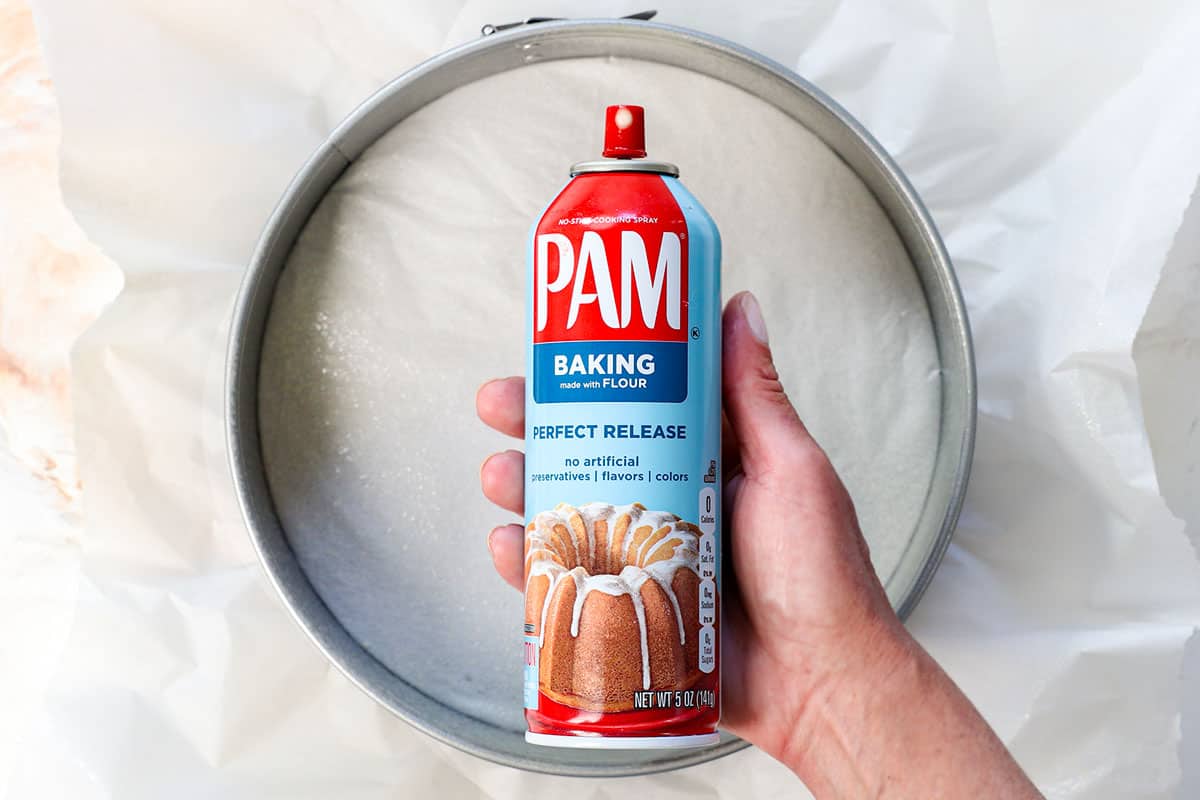
- Prepare Pan: Line the bottom of a 10” springform pan with parchment paper and lightly grease the inside of the entire pan with nonstick cooking spray containing flour. You may use a 9-inch pan, but you may have a little filling left over—delicious with berries, yum!
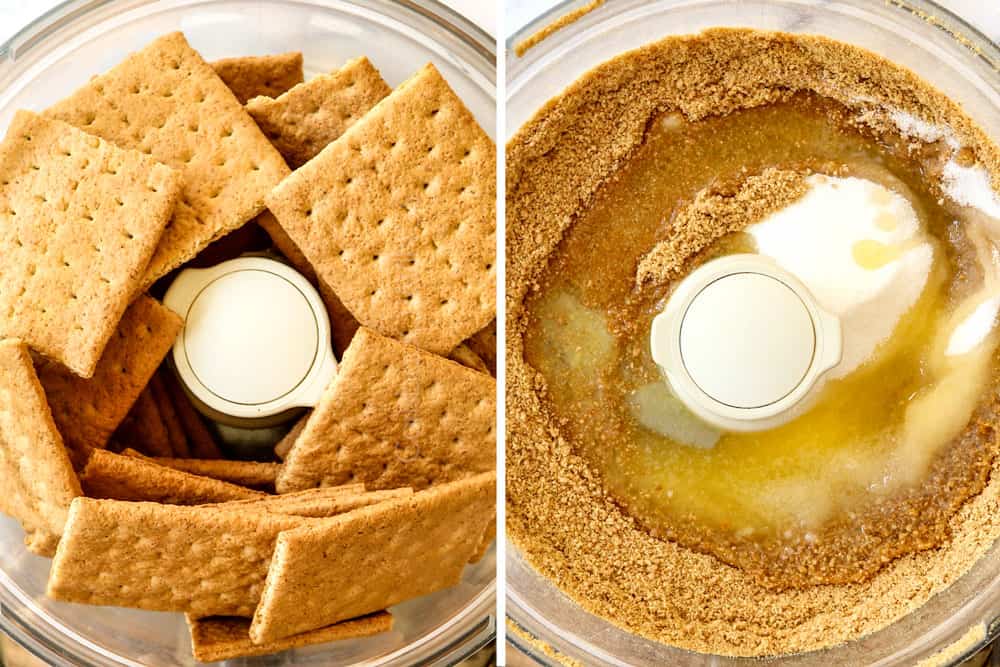
- Make Crust: Add the Graham crackers to a food processor and pulse until finely ground (or crush in a bag with a rolling pin). Add the butter, sugar, and salt and pulse (or stir) until evenly combined.
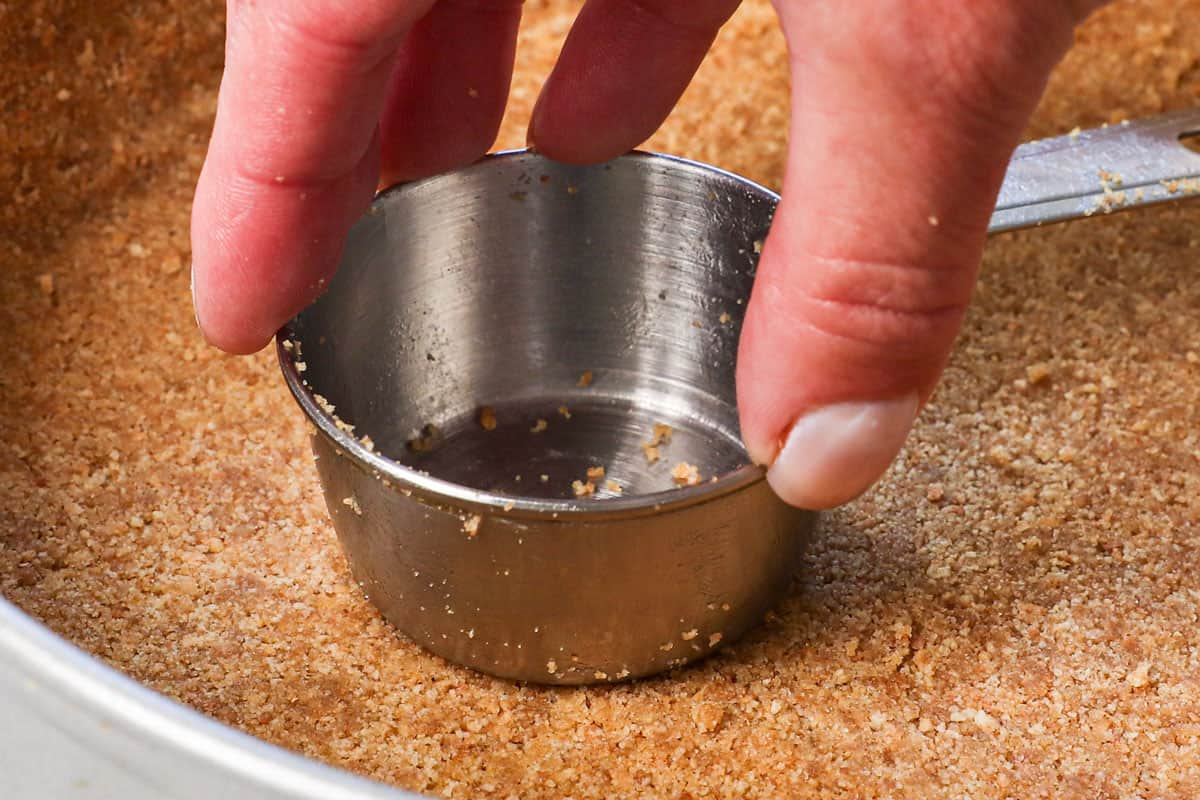
Form Crust: Add the crumbs to the greased springform pan and press them firmly up the sides, then down onto the bottom of the pan. Use the bottom of a measuring cup to press the bottom and sides until they are very compact (this helps prevent cracking when sliced).
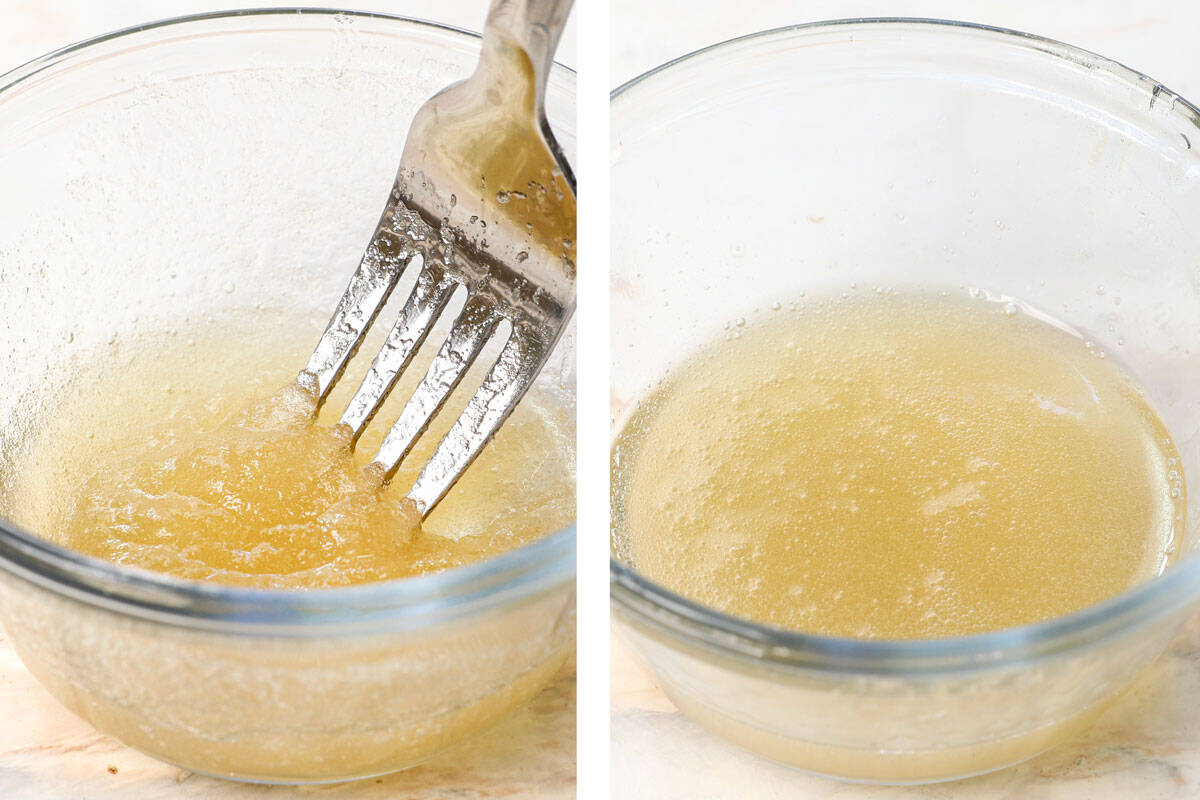
Mix Gelatin: Add the unflavored gelatin to a small microwave-safe bowl, then pour the cold water over top; whisk to dissolve. Let it stand while you make the whipped cream (below), at least 3 minutes (it will firm up during this time).
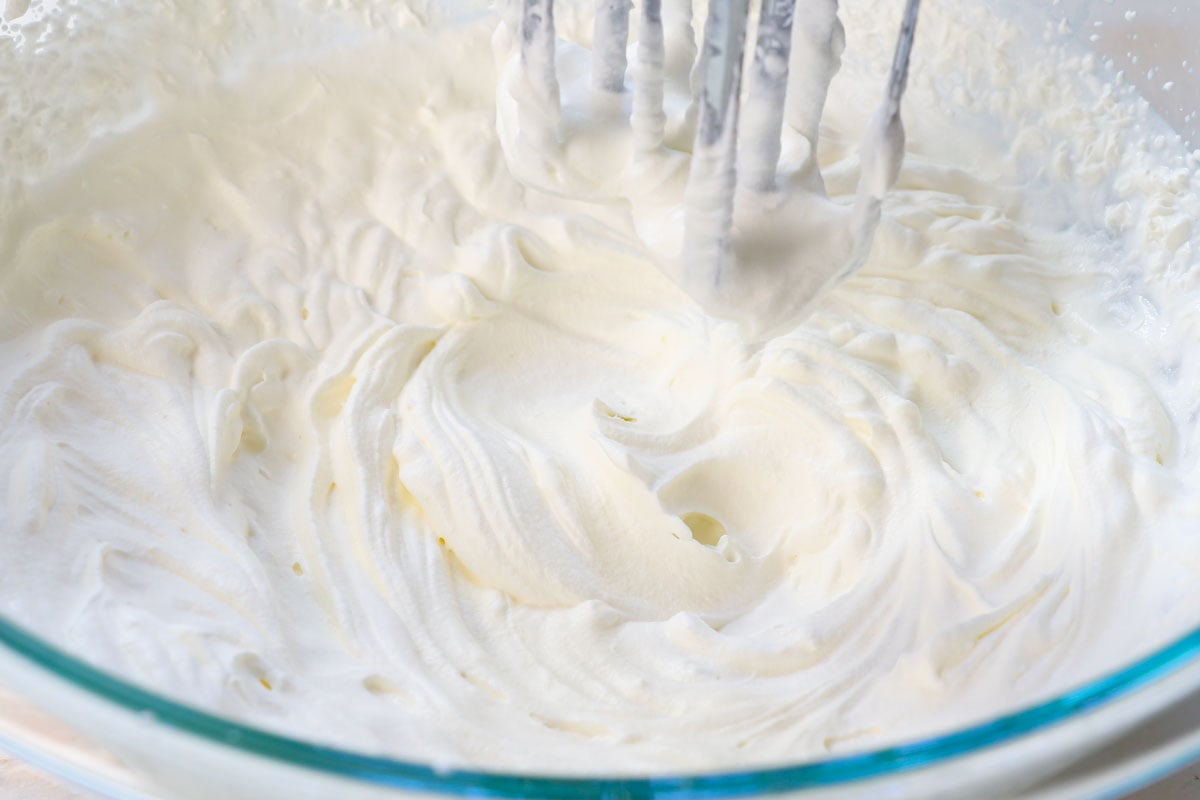
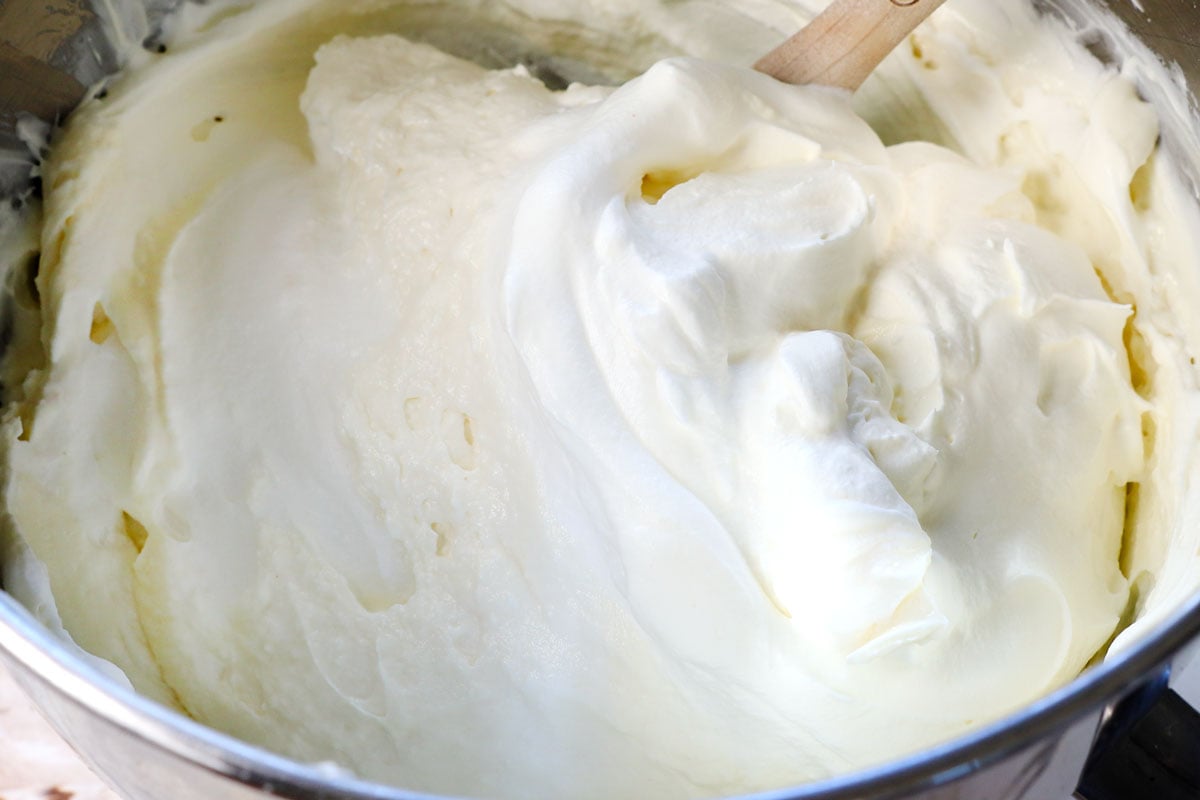
- Make Whipped Cream: Using a hand mixer, whip the cold heavy cream in a large bowl until it forms stiff peaks; set aside.
Microwave Gelatin: Microwave for 20 seconds. Stir the mixture, then set aside to cool slightly before using. Meanwhile:
- Beat Cream Cheese: Using a stand mixer fitted with the paddle attachment, beat the cream cheese and granulated sugar on medium-high speed for 1 minute, or until very smooth. Scrape down the sides and up the bottom of the bowl a few times. Add the sour cream, lemon juice, vanilla, and salt. Beat on medium-high for 2 minutes.
Add Gelatin: Reduce the speed to low and gradually drizzle in the gelatin, then increase the speed to medium for 10 to 20 seconds to combine. (The gelatin should be runny/liquid when ready to use. If not, microwave again for 10 seconds and set aside to cool again for a few minutes to lukewarm.)
- Add Whipped Cream: Using a rubber spatula, gently fold the whipped cream into the cream cheese mixture until well combined. Avoid overfolding or being too aggressive, as you don’t want to deflate the air in the whipped cream. Pour the filling into the crust and spread it evenly with an offset spatula.
Chill: Cover with foil or plastic wrap and refrigerate for at least 12 hours, preferably overnight.
- Decorate: Unclip and lift the rim of the pan, then use the parchment paper to slide the cheesecake onto a serving plate. Top the cheesecake with fresh berries, strawberry sauce, blueberry sauce, caramel sauce, ganache, etc., if desired. (See post for LOTS of topping ideas!)
Serve: Run a sharp knife under hot water before slicing. Clean the knife between each slice. Enjoy!
- Unflavored gelatin powder: This is a common baking ingredient and can be found next to the packages of Jell-O and pudding at your grocery store, or on Amazon HERE. This is key to a firm, sliceable texture.
- Cream cheese: Use full-fat brick cream cheese for the best texture; avoid using whipped or spreadable varieties. The cream cheese must be fully softened to room temperature for the smoothest texture. It’s better to err on the side of it being too soft than too hard. You should be able to press a finger into it easily. If it’s not soft, you’ll have a lumpy cheesecake!
- To soften cream cheese quickly: Place the unopened cream cheese blocks (still sealed in their wrappers) in a bowl of warm water (not hot) for about 10-15 minutes. Ensure the water is just warm to the touch—too hot can cause uneven melting.
- Cool the gelatin slightly before adding: If the gelatin is too hot, it can melt the whipped cream or cream cheese—let it cool to lukewarm before incorporating.
- Reheat gelatin if needed: On the opposite end of the spectrum, if you wait too long to use the gelatin, it will start to thicken and can solidify. If it’s not runny, then microwave it again for 5-10 seconds, then cool slightly before using.
- Variations: See the post for LOTS of fun mix-in and topping ideas!
- Storage: Store in the refrigerator for up to 7 days, noting that the crust will start to soften after 4 days. Add whipped cream or berries just before serving.

Did You Make This Recipe?
Tag @CarlsbadCravings and Use #CarlsbadCravngs
Leave a Review, I Always Love Hearing From You!
carlsbadcravings.com (Article Sourced Website)
#Cheesecake #Recipe #Bake