One of my favorite things to do with my girls when they were younger—and honestly, we still do it now—is bake together. There’s something magical about mixing simple ingredients and transforming them into a warm, delicious treat. Seeing their little faces light up as they learned to crack an egg or measure flour for the first time? Pure joy.
And while baking is definitely fun (and tasty), it’s also such a great way to sneak in a little learning. Measuring, following directions, patience—it all happens naturally in the kitchen.
That said, I understand how overwhelming it can be to welcome little hands into a kitchen with hot ovens and flour everywhere. So I’ve rounded up some easy, kid-friendly baking recipes that are perfect for making together. They’re simple, sweet, and best of all, end with a yummy snack you all get to enjoy.
10 Easy Baking Recipes for Kids to Make Together
Banana Oat Muffins
This banana oat muffin recipe makes soft, lightly sweet treats that basically taste like a cozy little hug in muffin form. The oats add a bit of hearty texture, and thanks to the bananas and honey, they stay moist and delicious.
They’re one of those snacks you feel good handing over to your kids. Bananas bring the potassium and fiber, oats give slow-releasing carbs, and the cinnamon? That’s just a bonus because it makes the whole kitchen smell amazing.
I love these for busy mornings, after-school snacks, or any time I have a couple of spotty bananas hanging around.
Ingredients
- 2 ripe bananas, mashed
- 1 cup rolled oats
- 1 egg
- ¼ cup honey or maple syrup
- 1 tsp baking powder
- ½ tsp cinnamon
Instructions
Step 1: Preheat your oven to 350°F. Then, line a muffin tin with paper liners or lightly grease it with oil or butter.
Step 2: In a big bowl, mash your ripe bananas with a fork until they’re nice and smooth. The more brown spots, the better—they’ll make your muffins naturally sweet and flavorful.
Step 3: Add in the egg, honey (or maple syrup), and cinnamon. Then, whisk everything together until it’s all combined.
Step 4: Stir in the oats and baking powder. Mix until just combined—don’t worry about a few lumps. Overmixing can make muffins dense, and we want these to be fluffy and tender.
Step 5: Scoop the batter into your muffin cups, about ¾ full. If your little ones want to help, this is a fun and easy step to hand off.
Step 6: Bake for 15-18 minutes, or until the tops are lightly golden and a toothpick comes out clean. Let them cool for a few minutes so they set up nicely.
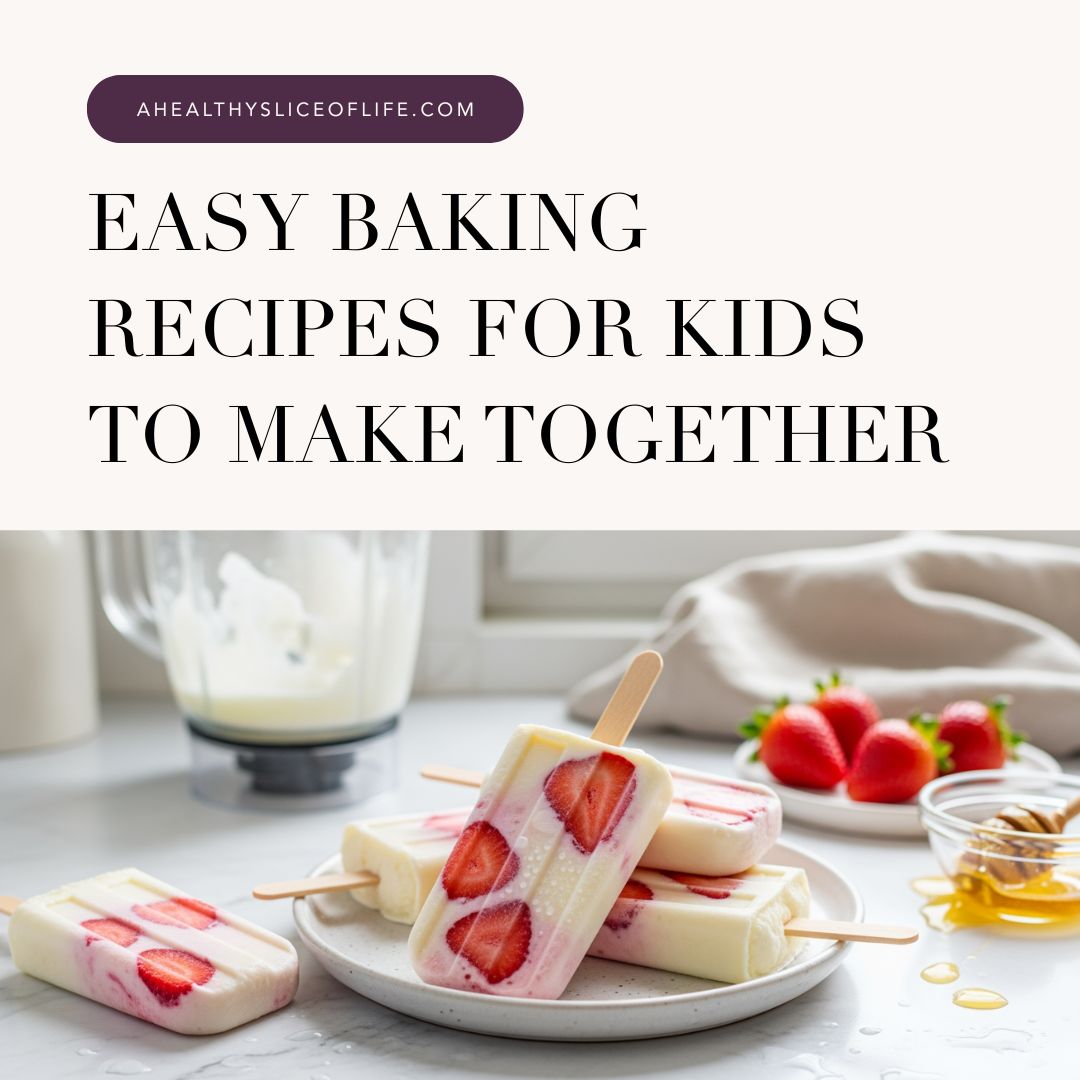
Strawberry Yogurt Pops
These Strawberry Yogurt Pops are creamy, a little tangy, and just the right amount of sweet. It’s like strawberry shortcake meets frozen yogurt. They’re cool, fruity, and melt-in-your-mouth good.
They’re also one of my favorite “no-bake” recipes to make with kids. Just a little mixing, pouring, and patience while they freeze. Kids love being part of the action, especially when they get to taste-test the mixture before it goes into the molds. And as a bonus? These pops are packed with protein, probiotics, and vitamin C.
Ingredients
- 1 cup plain Greek yogurt
- ½ cup chopped fresh or frozen strawberries
- 2 tbsp honey or maple syrup
- ½ tsp vanilla extract
Instructions
Step 1: Rinse and chop your strawberries into small pieces. If you’re using frozen ones, let them thaw a bit so they blend easily. This is a great task for little helpers—soft strawberries and a butter knife are a kid-friendly combo.
Step 2: Toss the strawberries, yogurt, honey, and vanilla into a blender or food processor. Blend until smooth and creamy.
Step 3: Taste test time! This is always the kids’ favorite step. If it needs a little more sweetness, add another drizzle of honey and give it one more quick blend. (This is also a great way to help them practice listening to their taste buds.)
Step 4: Pour the mixture into popsicle molds. Don’t have any molds? No problem. Use small paper cups and cover them with foil before sticking in a wooden craft stick. If kids are helping, use a measuring cup with a spout for less mess and an easier pour.
Step 5: Add sticks and pop the molds in the freezer for at least 3-4 hours, or overnight if you can wait.
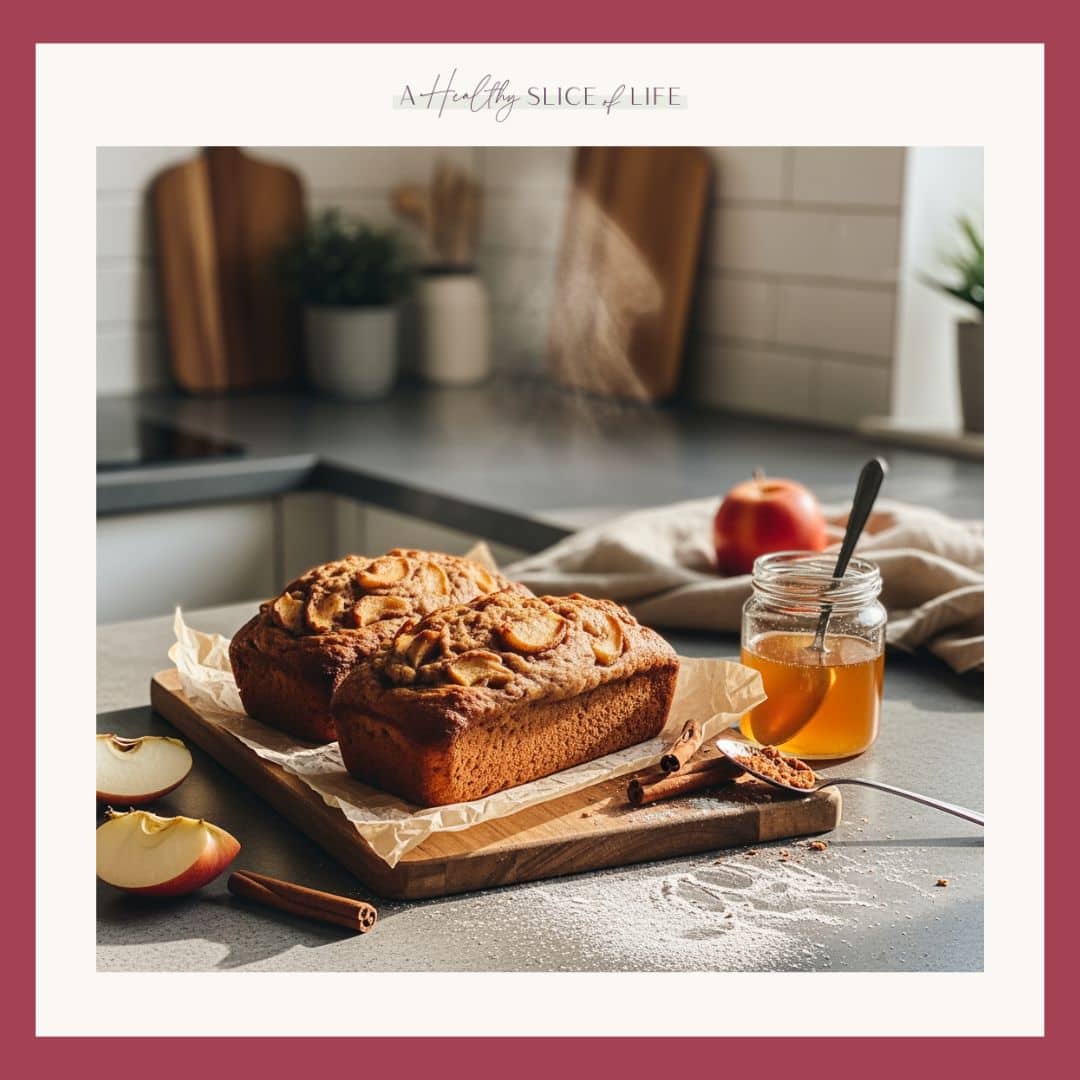
Apple Cinnamon Mini Loaves
These little loaves are soft, moist, and full of cozy cinnamon goodness. Think: apple pie you can eat for breakfast. Each bite has just the right amount of sweetness from applesauce and honey. Plus, they’ll make your whole kitchen smell like fall while they bake.
These use wholesome ingredients like whole wheat flour and applesauce, which also means they’re lower in sugar and high in fiber. They’re our go-to baking project with the kids—easy steps, no mixer, and perfectly sized for little hands.
Ingredients
- 1 cup whole wheat flour
- ½ cup unsweetened applesauce
- ¼ cup honey or maple syrup
- 1 egg
- ½ tsp baking soda
- 1 tsp cinnamon
Instructions
Step 1: Preheat the oven to 350°F. While you wait, grease two mini loaf pans or line them with parchment paper. This is a great step for kids—hand them a pastry brush or paper towel with a little oil and let them help.
Step 2: In a large bowl, whisk together applesauce, honey, and egg until everything is nice and smooth. Kids love this part—watching the honey swirl into the applesauce is weirdly satisfying. It’s also a great opportunity to talk about how eggs help baked goods rise.
Step 3: In a separate bowl, stir together the flour, cinnamon, and baking soda. Make sure everything is well mixed so the cinnamon is evenly distributed.
Step 4: Pour the dry ingredients into the wet and gently stir until just combined. The batter will be thick and smell amazing. Try not to overmix—it’s tempting, I know—but that can make the loaves dense.
Step 5: Scoop the batter into the prepared pans, filling each about ¾ of the way. A small measuring cup makes this step easier for kids (and neater for everyone).
Step 6: Bake for 20-25 minutes, or until the tops are golden brown and a toothpick comes out clean. Your kitchen will smell like cinnamon apples, and it’s just the best.
Step 7: Let them cool in the pan for 10 minutes before moving to a wire rack. Enjoy warm with a little butter or almond butter on top… or wrap them up for later.
Carrot Cake Bites
These Carrot Cake Bites are sweet, spiced, and satisfying, with a soft, chewy texture that feels like dessert. The best part? It doesn’t require any baking. The flavor comes from fresh-grated carrots, warm cinnamon, and a hint of honey. And the shredded coconut adds just the right amount of sweetness.
They’re a great recipe to make with kids because there’s no oven, no waiting, and no real way to mess them up. Everything mixes together in one bowl, which means less cleanup (hooray!), and forming the bites is perfect for little hands.
Ingredients
- 1 cup grated carrots (about 2 medium carrots)
- ½ cup almond flour
- 2 tbsp honey
- ¼ tsp cinnamon
- ¼ cup shredded unsweetened coconut
Instructions
Step 1: Start by peeling and grating your carrots using a fine grater. This is a fun task for older kids who can handle a grater safely, or little ones can help by holding the bowl steady.
Step 2: In a medium mixing bowl, add the grated carrots, almond flour, cinnamon, honey, and half of the shredded coconut. Then, stir everything together with a spoon until it forms a thick, slightly sticky dough. It should hold together when you press it between your fingers.
Step 3: If the mixture feels too wet, sprinkle in a little more almond flour. Or, if it’s too dry, add an extra drizzle of honey.
Step 4: Scoop small portions of the dough (about a tablespoon each) and roll them between your palms to make bite-sized balls. Try to make them roughly the same size so they look uniform when plated.
Step 5: Pour the remaining shredded coconut into a shallow bowl or plate. After that, roll each ball in the coconut until it is evenly coated.
Step 6: Place the finished bites on a plate or small tray and refrigerate them for at least 30 minutes. This is what helps them firm up to that perfect texture! Then, store your carrot cake bites in an airtight container or in the fridge for up to 5 days.
No-Bake Oatmeal Cookies
These No-Bake Oatmeal Cookies are chewy, chocolatey, and just sweet enough. Think brownie bit meets granola bar. They’ve got that rich cocoa flavor, balanced perfectly with creamy peanut butter, and the oats give them a hearty texture.
What I love most about them? They’re ridiculously easy. No oven. No mixer. No drama. Just mix, roll, and snack. Plus, they’re full of energy-boosting ingredients, making them great for after-school snacks, lunchboxes, or those “hangry” moments between activities.
Ingredients
- 1 cup rolled oats
- ½ cup peanut butter (creamy works best)
- ¼ cup honey
- 2 tbsp unsweetened cocoa powder
Instructions
Step 1: In a medium bowl, stir together the peanut butter, honey, and cacao powder. If your peanut butter is super thick, warm it in the microwave for 20 seconds to help it mix more easily.
Step 2: Add the oats and mix until everything’s coated and sticky. The mixture should be thick but workable.
Step 3: If it feels too dry, add a tiny drizzle of honey or peanut butter. Too wet? Sprinkle in a few oats. It’s a great hands-on way for kids to learn how ingredients work together.
Step 4: Scoop out small spoonfuls (about a tablespoon each) and roll them into balls. This part is super fun for kids, especially when they get a little messy.
Step 5: Place the cookies on a parchment-lined plate or tray, then pop them in the fridge for about an hour to firm up.
Blueberry Breakfast Bars
These Blueberry Breakfast Bars are everything I want in a morning bite. They’re soft, sweet, and filled with juicy berries in every single bite. They’re kind of like if a blueberry muffin and a granola bar had a baby. The oats give them that hearty, cozy texture, and the almond flour keeps them tender and crumbly.
This is one of those “let the kids help” recipes I reach for often. No mixer, no chilling, no complicated steps—just mix, press, bake, and done. My girls love watching the blueberries swirl through the batter. As for me, I love having a batch of these ready to grab for school lunches or a fast breakfast with some fruit and yogurt.
Ingredients
- 1 cup rolled oats
- ½ cup almond flour (or whole wheat flour)
- ¼ cup honey
- 1 egg
- ½ cup fresh or frozen blueberries
Instructions
Step 1: Preheat the oven to 350°F and line an 8×8-inch baking dish with parchment paper. Leave a little extra over the sides so you can lift the bars out easily once they’re baked.
Step 2: In a large bowl, whisk the egg and honey until smooth. This helps give the bars that soft, chewy texture.
Step 3: Add the oats and almond flour, and stir everything together until everything is well combined. The mixture will be thick and a bit sticky, which is just right.
Step 4: Fold in the blueberries. If you’re using frozen berries, toss them straight from the freezer—no need to thaw. As you stir, the batter turns swirly shades of purple and blue, making it look like edible art for the kids.
Step 5: Scoop the mixture into your prepared pan and press it down with a spatula (or clean hands). You want it to spread evenly so everything bakes at the same time. I usually give the kids the job of “smoothing out the bumps.”
Step 6: Bake for 20-22 minutes, or until the edges look golden and the center is set. Your kitchen will smell amazing. When you’re ready to serve, let the bars cool completely before slicing. This helps them hold together when you cut them into squares or bars.
Chocolate Chip Chickpea Blondies
Okay, hear me out—chickpeas in dessert. I know it sounds a little out there, but trust me on this one. These Chocolate Chip Chickpea Blondies are soft, sweet, and taste like gooey cookie dough in bar form. And the best part? You’d never guess they’re flourless and packed with protein and fiber. Total mom win!
They’re one of my go-to recipes when I want something sweet on hand but don’t feel like navigating a sugar crash. And because there’s no raw flour or eggs, your kids can lick the spoon (and they will!). It’s also an easy one to make together since most of the magic happens in the blender.
Ingredients
- 1 can (15 oz) chickpeas, drained and rinsed
- ¼ cup peanut butter (or almond butter)
- ¼ cup honey
- 1 tsp vanilla extract
- ½ tsp baking powder
- ¼ cup chocolate chips (plus a few extra for sprinkling)
Instructions
Step 1: Preheat your oven to 350°F and line an 8×8-inch pan with parchment paper. (Pro tip: leave a little overhang so you can lift them out easily later.)
Step 2: Add the chickpeas, peanut butter, honey, vanilla, and baking powder to a food processor. Then, blend until it’s all smooth and creamy. Pause to scrape down the sides if needed.
Step 3: Once everything is blended, stir in the chocolate chips by hand. This keeps them from melting too early. Afterwards, let the kids sprinkle in a few extra and sneak a taste—it’s totally safe to sample.
Step 4: Scoop the batter into your prepared pan and smooth it out with a spatula. My favorite hack? Add a few more chocolate chips on top for that bakery-style look. My girls love to press them in one by one, like they’re decorating a masterpiece.
Step 5: Bake for 20-25 minutes, until the top is set and the edges are lightly golden. Your kitchen will smell like a chocolate chip cookie dream.
Step 6: Let the blondies cool for at least 10 minutes before slicing. They’ll firm up as they sit, so you get that perfect soft-meets-fudgy bite.
Sweet Potato Brownies
These Sweet Potato Brownies are gooey, rich, and full-on chocolatey. And yes, they’ve got a veggie hiding inside. Don’t worry—no one will ever know. The sweet potato gives them a naturally smooth texture and just the right amount of sweetness. Then, the almond butter and cocoa powder bring the fudge factor.
I love baking these with the girls when we want a sweet treat without the sugar crash. Plus, they’re packed with fiber, vitamin A, and healthy fats. So, if one ends up becoming breakfast on a busy school morning, I’m not mad about it.
Ingredients
- 1 cup mashed sweet potato (about 1 medium cooked sweet potato)
- ¼ cup unsweetened cocoa powder
- ¼ cup almond butter
- 1 tsp vanilla extract
- ¼ cup honey
Instructions
Step 1: Preheat your oven to 350°F and line an 8×8 baking pan with parchment paper. This makes cleanup easier and helps the brownies lift out in one piece.
Step 2: If you haven’t already cooked your sweet potato, roast it in the oven or microwave it until fork-tender. Then mash it up with a fork until it’s smooth and creamy.
Step 3: In a large mixing bowl, stir together the mashed sweet potato, almond butter, honey, and vanilla until smooth. The mixture should look glossy and thick. This step is super forgiving, so let the kids take over with the spoon.
Step 4: Add the cocoa powder and give it another good stir until everything’s well combined. The batter will be thick (similar to cookie dough!) and oh-so chocolatey.
Step 5: Spread the batter into your prepared pan, smoothing it out with a spatula. Make sure to press it into the corners for even baking. And, if you want to level it up, sprinkle chocolate chips on top before baking.
Step 6: Bake for 25-30 minutes, or until the edges are set and the center feels firm-ish to the touch. Don’t overbake! These are supposed to be soft and fudgy.
Step 7: Let them cool in the pan for at least 10 minutes before slicing. This helps them hold their shape.
3-Ingredient Peanut Butter Cookies
These Peanut Butter Cookies are soft, chewy, and rich with that classic salty-sweet flavor combo. They’ve got just the right crisp edges and buttery, melt-in-your-mouth center that makes them easy to love.
They also happen to be the easiest cookie recipe ever. No flour, no mixers, no long ingredient list. Just three pantry staples and a little bit of time. They’re one of my favorite cookies to bake with the girls because the steps are simple and the cleanup is minimal.
Ingredients
- 1 cup peanut butter (creamy or crunchy—both work!)
- ½ cup sugar (white or coconut sugar for a less refined option)
- 1 egg
Instructions
Step 1: Preheat your oven to 350°F and line a baking sheet with parchment paper. While the oven’s heating up, let your little helpers set up their baking “stations.”
Step 2: Add the peanut butter, sugar, and egg into a mixing bowl. Stir everything together until it forms a thick, glossy dough.
Step 3: Scoop out small spoonfuls of dough and roll them into balls about 1 inch wide. Space them a couple of inches apart on your baking sheet.
Step 4: Now for the best part: the crisscross! Hand over a fork and let the kids gently press into each dough ball, first one way, then the other. This flattens the cookies a bit and gives them that classic peanut butter cookie look.
Step 5: Bake for 10 minutes, or until the edges are lightly golden and the tops look set. Don’t worry if they still feel soft; they’ll firm up as they cool. Let them rest on the pan for about 5 minutes before transferring to a cooling rack.

Mini Mug Cakes
These Mini Mug Cakes are one of those little life hacks every busy mom needs in her back pocket. They’re quick, customizable, and come together with just a mug and a microwave.
Each one turns into a warm, single-serve cake that feels like a personal treat. You can make them vanilla, chocolate, or even sprinkle-filled “birthday cake” style—let your kids’ imaginations run wild! Plus, they’re a great way to sneak in some measuring and mixing practice.
Ingredients
- 4 tbsp flour (whole wheat or all-purpose)
- 2 tbsp sugar
- 2 tbsp milk
- 1 tbsp melted butter or oil
- ¼ tsp baking powder
- 1 tsp cocoa powder (optional—for chocolate version)
- Optional add-ins: sprinkles, chocolate chips, vanilla extract, cinnamon, honey
Instructions
Step 1: Grab a microwave-safe mug (about 8-10 oz). This will be your mixing bowl and your baking pan. Let your child pick their favorite—it makes it feel even more special.
Step 2: Add the flour, sugar, and baking powder to the mug. And, if you’re making a chocolate Mug Cake, don’t forget to stir in cocoa powder. Use a fork or a small whisk to combine everything together.
Step 3: Pour in the milk, melted butter or oil, and a splash of vanilla if you’re using it. Stir until smooth and thick, kind of like pancake batter.
Step 4: Here’s where it gets fun. Let each kid create their own flavor:
- Birthday Cake: Stir in sprinkles
- Chocolate Lover: Add chocolate chips
- Cinnamon Swirl: Sprinkle with cinnamon and a little honey
It’s like their own little cake lab to experiment in.
Step 5: Microwave on high for 60-90 seconds. Watch closely—it’ll puff up like magic! The top should look set but still soft. If it’s gooey in the middle, add an additional 10 seconds at a time.
Step 6: Let it cool for a minute (it’ll be hot!). Then add whipped cream, chocolate drizzle, or a few berries on top. Totally optional—but totally fun.
How to Bake with Kids
Set up a “kid baking station.”
Before you dive in, take a minute to gather everything your little baker will need. I’m talking about a mixing bowl, measuring cups, a whisk, and all the ingredients. Then, just set them out in one spot.
Giving your kids their own “baking station” not only makes them feel like a pro, but it also helps keep the mess (somewhat) under control. Bonus: it makes cleanup way easier later on!
Pick age-appropriate tasks.
Give your child a job that matches their age and stage. It builds confidence and keeps things running a little but more smoothly.
- Toddlers can help with pre-measured ingredients or stirring (very gently!).
- Preschoolers are great at cracking eggs, scooping batter, or using cookie cutters.
- Older kids can take on bigger tasks like reading the recipe, measuring, and using the oven—with your supervision, of course.
No matter their age, they’ll feel proud to help out and be part of the process.
Embrace the mess.
Flour will fly. Batter might end up on elbows. And honestly? That’s half the fun.
Before you get started, lay down a baking mat or a sheet of parchment paper to help catch the mess. Also, keep a damp cloth within reach for quick wipe-ups. Even if you don’t use it, you’ll be glad it was there. And don’t stress the spills—let your kids know it’s totally okay to get messy. Then make tidying up part of the routine (bonus points if you turn it into a game!).
Celebrate the result—perfect or not.
So what if the cookies are a little lumpy or the muffins sink in the middle? Celebrate every bite. Snap a photo, do a fun little taste test, and chat about what you might tweak next time. It’s all part of learning—and laughing—together in the kitchen. Because in the end, it’s not about picture-perfect results. It’s about making sweet memories that stick.
Get the kids involved in the kitchen with easy, kid-friendly recipes.
Some of my favorite memories from childhood? Baking with my mom in the kitchen. I can still picture the flour on the counter, egg shells in the sink, and the smell of something sweet in the oven. Plus, I’ll always remember how proud I felt as I cracked my first egg.
These days, there are so many blogs, Pinterest posts, and fun ideas floating around online. It’s easier than ever for moms to find simple, kid-friendly recipes to try with their little ones. And truly, it’s not just about the treat at the end—it’s the time together that kids will love most.
Want even more easy recipe ideas to try with your kiddos? I’ve rounded up a few of my favorites below:
www.ahealthysliceoflife.com (Article Sourced Website)
#Easy #Baking #Recipes #Kids